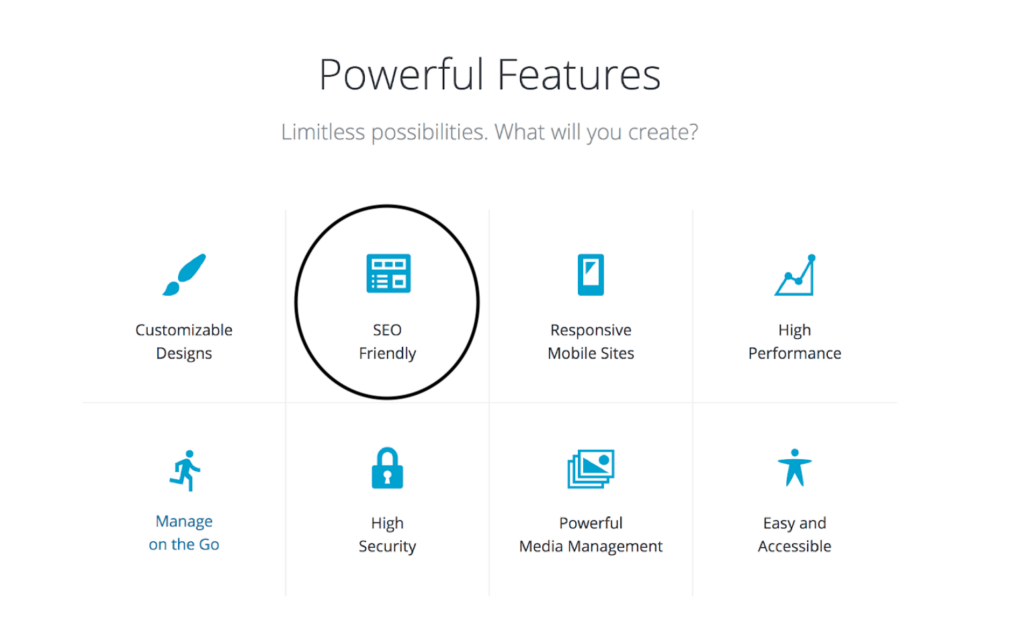
Chances are that you’ve chosen WordPress for your website’s content management system (CMS) because of its reputation of being SEO-friendly. In fact, you may have noticed the promise of the same on the platform’s website itself:
To top it off, here are some very insightful WordPress statistics:
- According to W3techs, WordPress has 61.8% of the CMS market share — more than all other systems (e.g., Drupal, Joomla) combined.
- According to a survey published by Netcraft, the number of total active websites is estimated at over 1.3 billion, i.e., around 455,000,000 websites are using WordPress right now.
- The latest WordPress version (5.3) is written in 52 languages, which includes the 12 most popular languages of the world: Chinese, English, Portuguese, Spanish, Arabic, French, Spanish, Urdu, Russian, Bengali, German, and Japanese.
- Numerous Fortune 500 companies prefer WordPress as their CMS- including The Walt Disney Company, Microsoft News Center, Sony Music, TED, NBC, CNN and many more.
- And lastly, among many other perks of using WordPress, WordPress.com Blogs have over 400 million monthly viewers, get 20 billion page views per month and is the fastest growing web publication software.
Interested in knowing more? Check this out.
Well, since WordPress is a well established go-to for your website because of its unique features that target the most basic SEO best practices out of the box, it does not equate to a perfectly optimised website.
It simply makes the traditional SEO practices a lot easier to employ.
It is important to not underestimate the right SEO tactics to use and how to implement these, and through this guide, we aspire to help you achieve the same.
The Prerequisites
Before getting to the SEO tips and tricks we have picked out for you, you must understand and download some key plugins:
Yoast SEO
Yoast SEO is one of the most widely popular WordPress plugins, with over 202 million downloads, and the reason behind its popularity are:
- Title and meta description templating
- A state-of-the-art Schema implementation which helps search engines crawl your website more efficiently
- The most advanced XML Sitemaps functionality
- Full control over your site’s breadcrumbs, which are links that allow a user to track their path from the page they are currently viewing to the home page of your website
- Avoids duplicate content by automatically setting canonical URLs
- Tools to write SEO-friendly texts
- Snippet preview that shows you how your post or page will look in the search results
- An FAQ and HowTo block for the WordPress editor
All in One SEO Pack
AIOSEO is one of the all-time most downloaded plugins for WordPress. Here is why:
- XML Sitemap support
- Image XML Sitemap submitted to Google and Bing
- RSS Sitemap (used for syndicating content around the web in a standardized way)
- Google AMP support (Accelerated Mobile Pages)
- Google Analytics support
- Schema.org Markup
- Support for SEO on Custom Post Types
- Advanced Canonical URLs
- Automatic notifications to Google and Bing about site changes
- Built-in API
- ONLY free plugin to provide SEO Integration for e-Commerce sites, including WooCommerce
- Nonce Security
- Generates META tags automatically
- You can override any title and set any META description and any META keywords you want.
- Compatibility with many other plugins
- Translated into 57 languages
- PHP 7 100% Compatible
W3 Total Cache
W3TC is the only web host agnostic Web Performance Optimization (WPO) framework for WordPress, enhancing website performance and reducing load times by leveraging features like content delivery network (CDN) integration and the latest best practices.
Watch this video for a quick overview of what W3 Total Cache offers.
Smush Image Compression and Optimisation
Smush optimises your image through lossless compression and:
- Lazy Load, i.e., Defer offscreen images with the flip of a switch
- Bulk Smush, i.e., compress and shrink up to 50 images with one click
- Image Resizing
- Quickly locate images that are slowing down your page speed
- Directory Smush, i.e., optimize and shrink images even if they are not located in the media library and much more!
Installation
These three plugs are crucial as they get your WordPress SEO game face on.
Need a little help with its installation process? Here to help! Just follow the steps below:
- Log into your WordPress backend. On the sidebar, hit Plugins > Add new.

Photo Credit: knowledgebase.constantcontact.com
- Search for the plugin you want. Click “Install Now.”

Photo Credit: ahrefs.com
A Reliable Hosting Provider
Site speed, uptime, and security are key reasons for sourcing a trustworthy hosting provider for your website.
Your website may suffer quality issues in cases of poor uptime, sketchy security and low site speed, which in turn would be detrimental to your WordPress SEO.
WordPress itself has recommended three hosting services which are:
Bluehost
Powering over 2 million websites, Bluehost offers WordPress-centric dashboards and tools along with 1-click installation, a free domain name, email, FTP, and more. Easily scalable and backed by legendary 24/7 support by in-house WordPress experts.
DreamHost
DreamHost has been committed to WordPress and its community for over 10 years. Their hosting platforms are optimized for WordPress, which allows you to take total control of your server or let the DreamHost team of experts handle everything for you.
SiteGround
SiteGround has tools that make managing WordPress sites easy: one-click install, managed updates, WP-Cli, WordPress staging and git integration. With their super-fast support team, you get exclusive access to the advanced WordPress expertise available 24/7. Along with the latest speed technologies that make WordPress load faster: NGINX-based caching, SSD-drives, PHP 7, CDN, HTTP/2, SiteGround proactively protects the WordPress sites from hacks.
Apart from the other recommended hosting services feel free to conduct your own research and hunt for the web hosting service that best suits your needs, but in any case, do not compromise on the quality by being tempted towards the cheapest option, as you are more likely to suffer from performance issues.
WordPress SEO Recommendations
As previously stated, WordPress itself isn’t a replacement for a solid SEO strategy, and a few tweaks can boost the already powerful CMS to rank your website high on the SERPs.
The following recommendations are very comprehensive and consist of technical SEO tips as well as non-technical ones.
WordPress SEO Basic Recommendations
Check Your Website’s Visibility Setting
WordPress has a feature which restricts crawlers to index your website by hiding it from search engines. While particularly useful when you’re building or rebuilding your site and don’t want visitors to see your work in progress, this feature could also lead to a heavy loss of potential clientele if not activated when your website is live.
The feature is found in your WordPress dashboard under “Settings” and “Reading”:

Photo Credit: certguidance.com
Moreover, make sure the Visibility option in the Document Settings module for a specific page or post is active so that others can view your desired content.
To check or change your visibility settings:
- Edit or add a Post or Page.
- Click Document Settings.
- Click the link Public next to Visibility under Status & Visibility.

Photo Credit: wordpress.com
Install an SEO-friendly theme
The Twenty Twenty default WordPress theme is very likely to be your last choice, given the plethora of free and premium themes available straight from the dashboard. However, the bad news is that many of these creative and interactive themes that have captured your attention are going to give your SEO a tough time.
While many themes claim to be SEO-friendly, it is not uncommon for themes to come bombarded with scripts and plugins that you will not use, and in turn, slow your site’s performance.
Therefore, before installing a theme, run its demo through Google’s web.dev tool to get insights on potential performance and SEO issues.
Apart from the above, there are many other ways of assessing your WordPress site’s’ SEO-friendliness:
1. Responsive design: According to Google, the more mobile-friendly your website is, the better it will be ranked. Therefore, try using a theme that provides the best mobile user experience.
To test this out, run the theme demo through Google’s Mobile-friendly Test tool to make insightful inferences:

Photo Credit: ultimatumtheme.com
2. Lightweight: Sometimes, less is more! Look out for third-party plugins and scripts that slow your website down.
Similarly, to identify if your theme has plugins which are of no use to you and is causing poor load time or website speed, run a live demo through Google’s PageSpeed Insights tool.

Photo Credit: machmetrics.com
Choose www or non-www
According to Google, www and non-www versions of the same URL are viewed as separate references to separate pages:

Photo Credit: ahrefs.com
Therefore, make sure you choose a preferred version and stick to it.
Under Settings > General, make sure you add your preferred version under WordPress Address URL and Site Address URL in your WP backend:
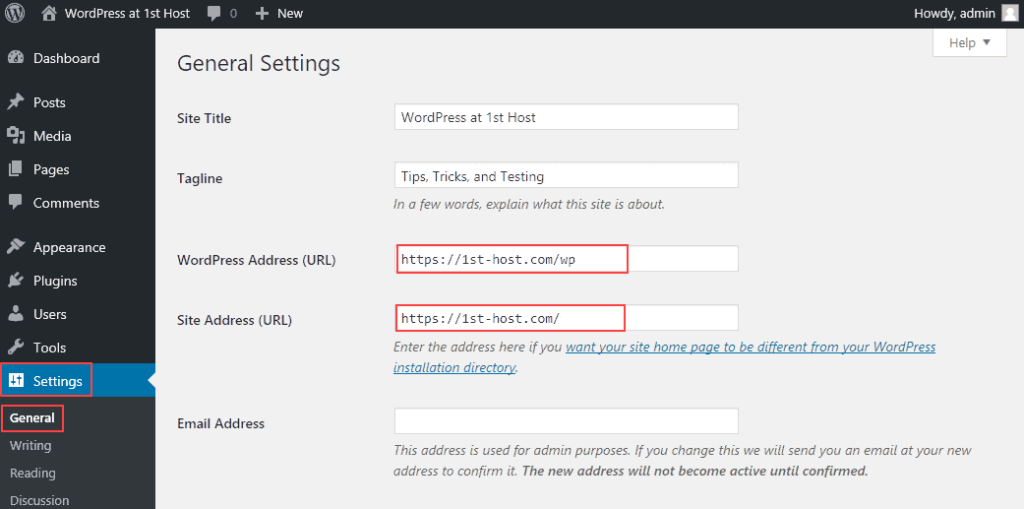
Photo Credit: hostpapasupport.com
In case you are wondering which version will be more rewarding for your SEO, there isn’t a specific answer to it since it all comes to personal preference. However, if your website is discoverable under both versions, we suggest you type both the www and non-www URLs and then choose the version that Google seems to prefer already.
Switch to HTTPs
Installing an SSL certificate which would allow you to switch from HTTP to HTTPs would be a great SEO move since Google confirmed SSL as a ranking factor in 2014. So, if there were two identical sites but one had SSL and one did not, Google would be more likely to rank the site with SSL.
SSL stands for Secure Sockets Layer and, in short, it’s the standard technology for keeping an internet connection secure and safeguarding any sensitive data that is being sent between two systems, preventing criminals from reading and modifying any information transferred, including potential personal details.
In a way, SSL is how businesses ensure that the visitor’s information is not intercepted by a hacker along the way.
Internet browsers tend to dislike non-secure websites and display warning messages to people visiting them, eroding visitors’ trust in affected sites. This can seriously harm your outreach as people might perceive your website to be affected with malware.
To do this, refer to the steps below:
Method 1: Setup SSL/HTTPS in WordPress Using a Plugin
The first step is to install and activate the WordPress plugin, such as the Really Simple SSL. Note that some of the best WordPress hosting companies (such as the ones we discussed- Bluehost, SiteGround, Dreamhost etc.) offer SSL Certificate, where purchasing one isn’t necessary or even required.
Upon activation, you need to visit Dashboard > Plugins. The plugin will automatically detect your SSL certificate, and it will set up your WordPress site to use HTTPs.
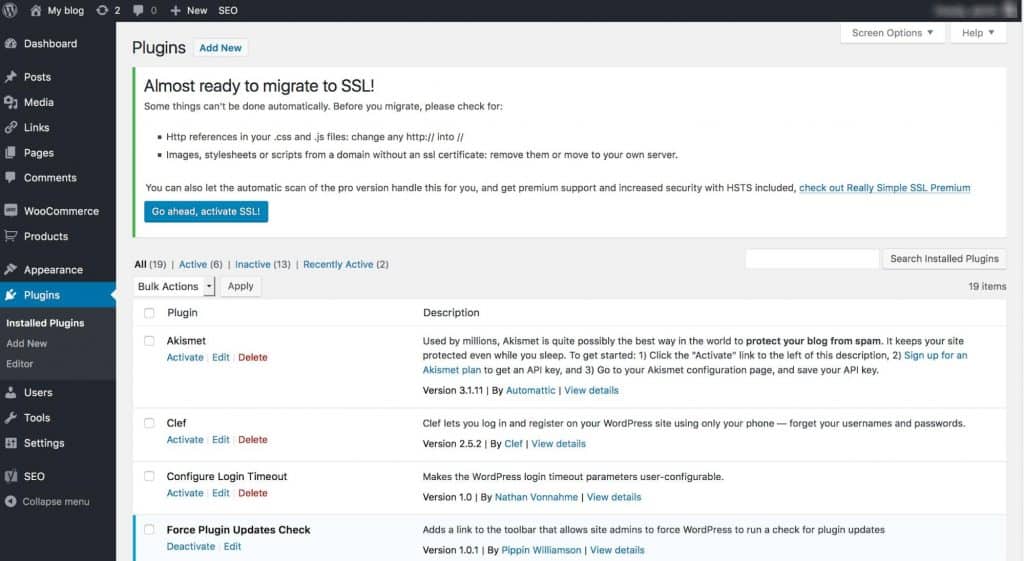
Photo Credit: wordpress.org
Method 2: Setup SSL/HTTPS in WordPress Manually
This method is recommended for a more optimised and permanent solution. Since this method involves a decent bit of editing WordPress theme and code files, hiring a professional (click here to book a call with us!) might be a better idea.
First, you need to visit Settings > General page. Here, you need to update your WordPress and site URL address fields by replacing http with https:

Photo Grid: wpbuffs.com
After clicking on Save, WordPress is going to log you out and ask you to re-login.
Next, you need to set up WordPress redirects from HTTP to HTTPS by adding the following code to your .htaccess file:
<IfModule mod_rewrite.c>
RewriteEngine On
RewriteCond %{HTTPS} off
RewriteRule ^(.*)$ https://%{HTTP_HOST}%{REQUEST_URI} [L,R=301]
</IfModule>
However, if you are using Nginx servers use the following code instead:
server {
listen 80;
server_name example.com www.example.com;
return 301 https://example.com$request_uri;
}
These codes avoid the WordPress HTTPS “not working” error because WordPress will now load your entire website using https.
To add SSL and HTTPS to your WordPress, then you need to configure SSL in the wp-config.php file by adding the following above the “That’s all, stop editing!” line in your wp-config.php file:
define(‘FORCE_SSL_ADMIN’, true);
Once you do this, your website is now fully set up to use SSL / HTTPS!
Use SEO-friendly Permalinks
A permalink or permanent link is a URL that is intended to remain unchanged for many years into the future, yielding a hyperlink that is less susceptible to link rot. Permalinks are often rendered simply, that is, as friendly URLs, for the ease of people to type and remember.
Therefore, permalinks are designed to be readable and user-friendly canonical URLs.
By default, WordPress uses URLs like this:https://domain.com/?p=123, which can be harmful to your SEO effort, and ultimately gives the user no hint about what the link is about, inhibiting user experience.
Moreover, optimizing your permalinks increases the likeliness of you getting keyword-rich backlinks.
You can choose the type of URLs WordPress uses in Settings > Permalinks.
You’ll see a few options, such as Plain, Post name, Numeric, etc.
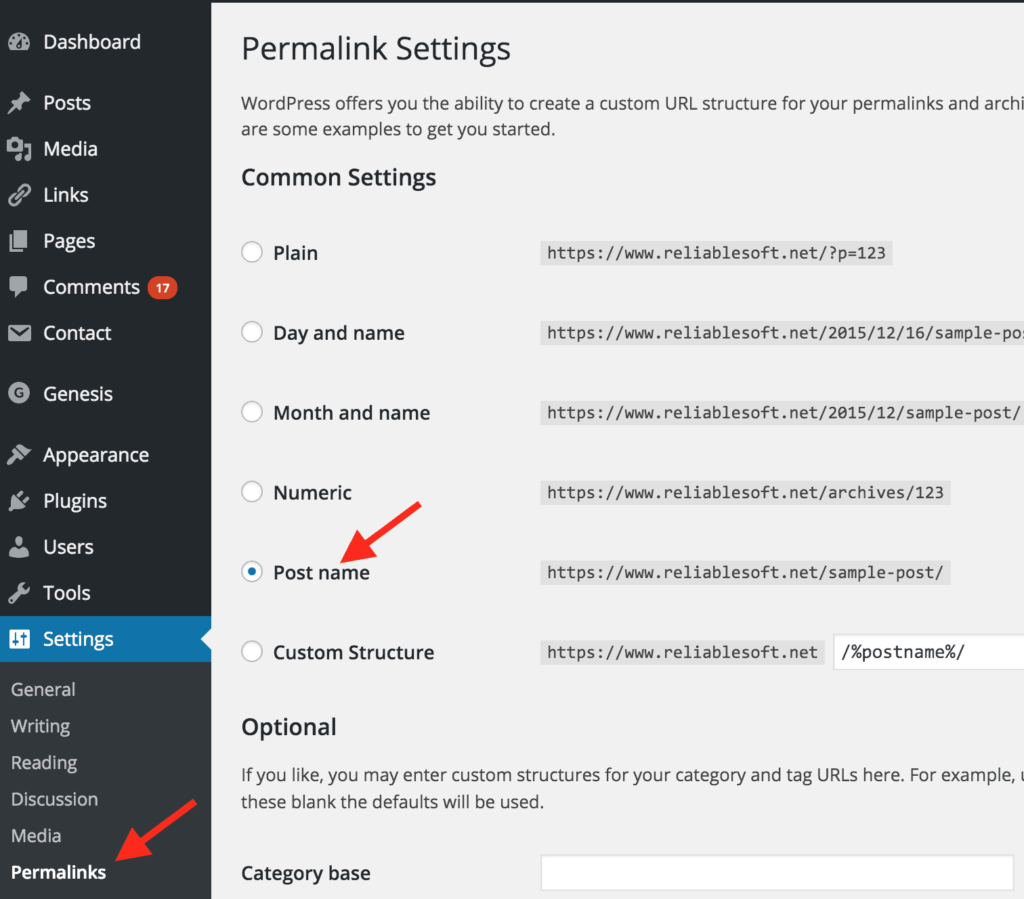
Photo Credit: reliablesoft.net
Edit the Post name since it’s the most SEO-friendly option for most websites.
An important note: If you already have content that uses a separate permalink structure, rethink, or even avoid changing it as it may cause broken links.
Optimising Site Speed
There is nothing more frustrating than a website that won’t load quickly enough. This can and most definitely will result in lesser engagement and conversion rates across your websites.
The first step to optimising is to discover where you stand. You need to measure your current website and see how much work it needs and which tool will be best able to complement and fix it.
To begin with, there are multiple metrics which could help you understand where your website stands, but each metric may cause conflicting results. However, there are a few ‘outside-in’ tools which scan the website and measure how it loads. We recommend using multiple tools, as they measure things differently, and are useful for different assessments. For example:
- WebPageTest is great for providing a ‘waterfall’ view of the website, and how all of the assets load, such as:

Photo Credit: yoast.com
- Google PageSpeed Insights is a bit simplistic, but it provides ‘real user metrics’ of your website, straight from Google.
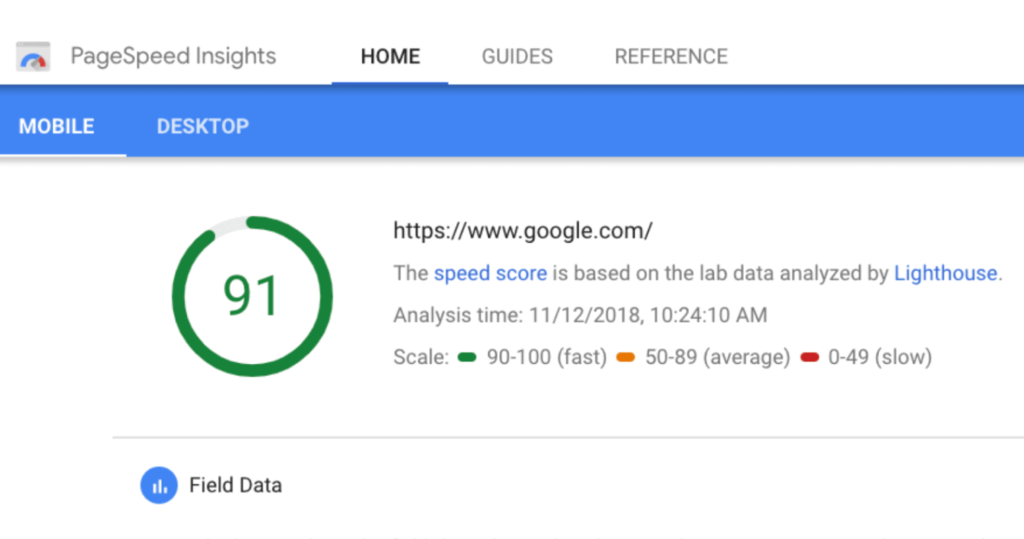
Photo Credit: searchenginejournal.com
- Lighthouse for Chrome provides an incredibly sophisticated analysis of the performance and behaviour of the site:
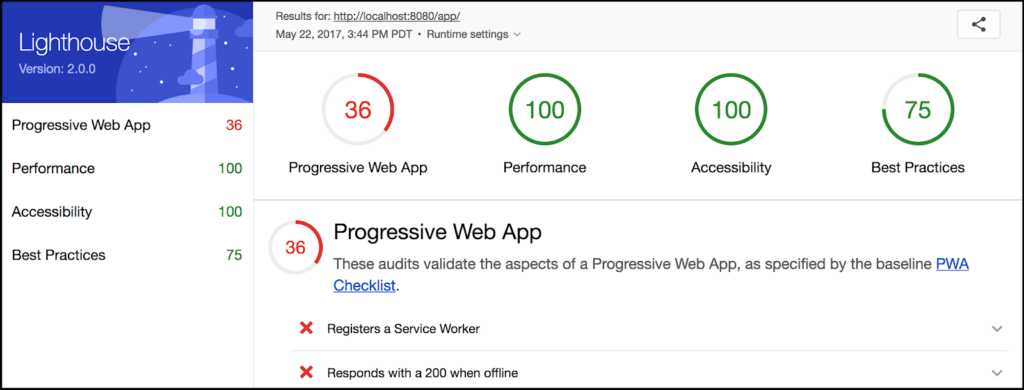
Photo Credit: developers.google.com
- Chrome Developer Console shows you exactly what’s happening as your site loads, on your computer, in your browser.
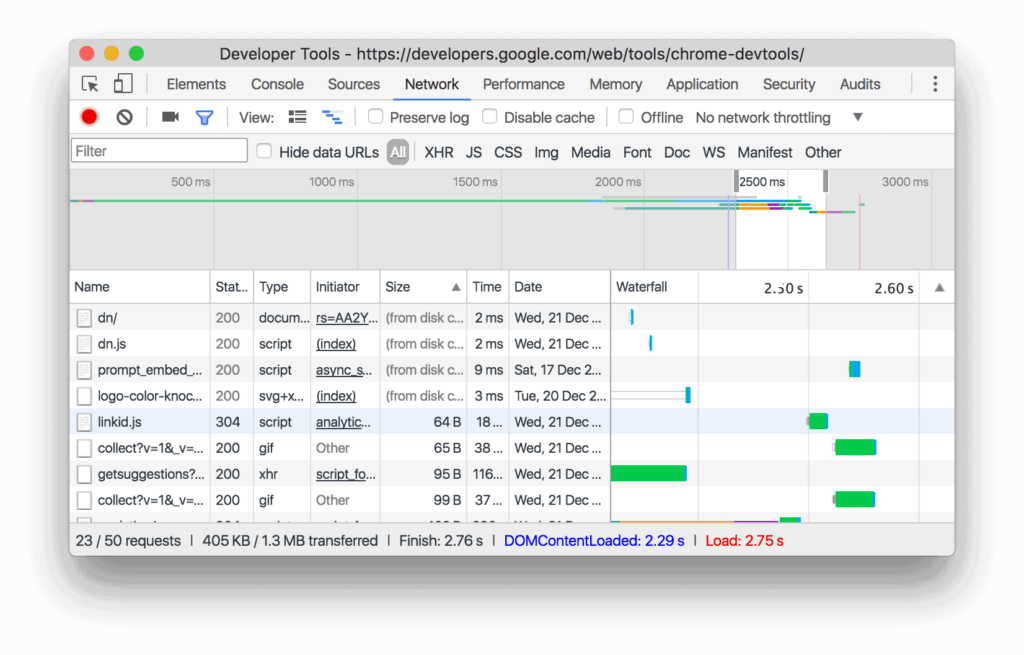
Photo Credit: developers.google.com
- Speed report in Google Search Console shows you how fast or slow your pages load over any given time.
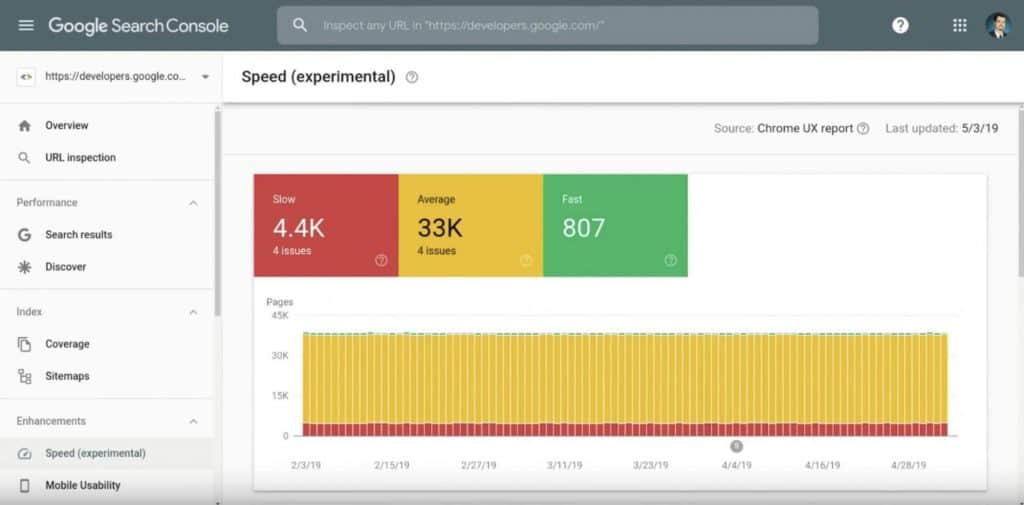
Photo Credit: searchengineland.com
WordPress SEO Technical Recommendations
The following tips will take your SEO efforts a step further; using the following applications and making technical changes; you will draw insightful inferences which will help you rank high on Google! Moreover, our talented team of WordPress SEO experts are always here to help! Book a call now!
Setting Up Google Analytics and Google Search Console
Go all out with these two apps!
Google Analytics is a web analytics service offered by Google that tracks and reports website traffic. Studying and noticing how your audience engages with your business is very insightful, so make sure you take advantage of this and use the information you gather to your benefit!
Here is how you set it up:
Google Analytics
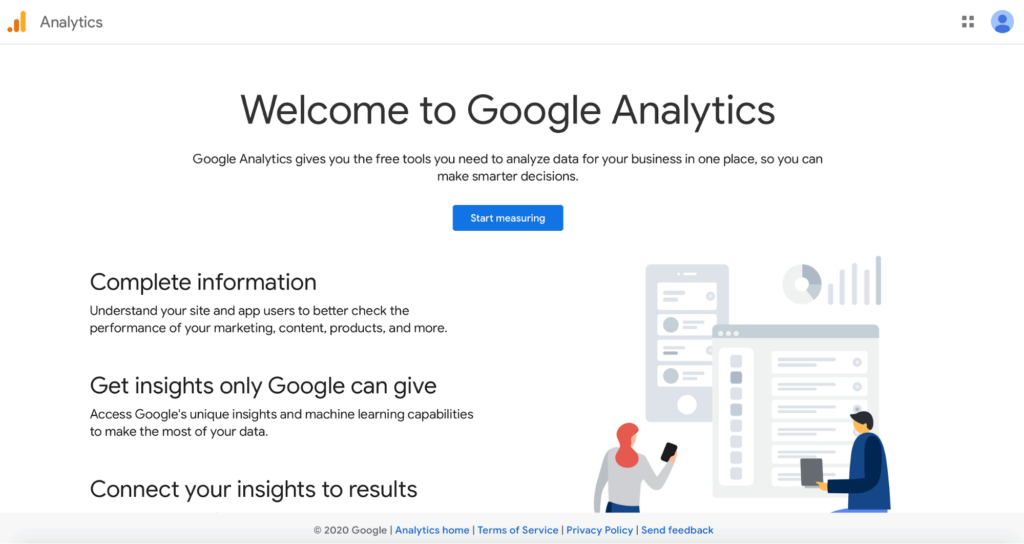
First, on the Google Analytics website, Click on Start Measuring.
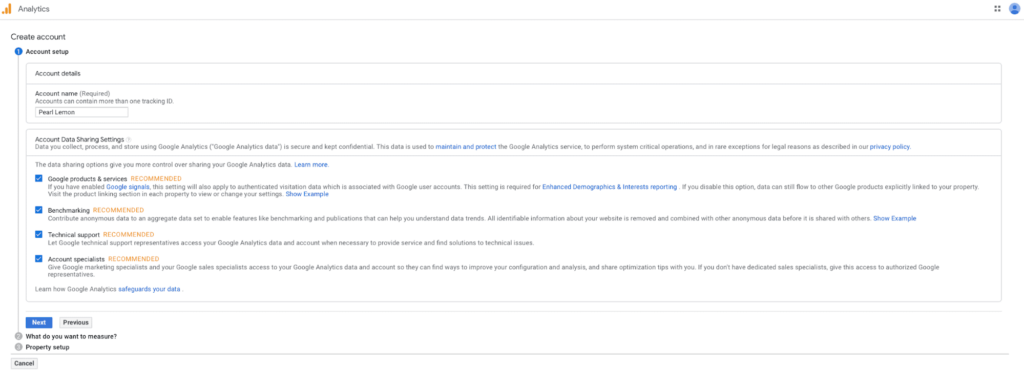
The second step is to add an Account Name:
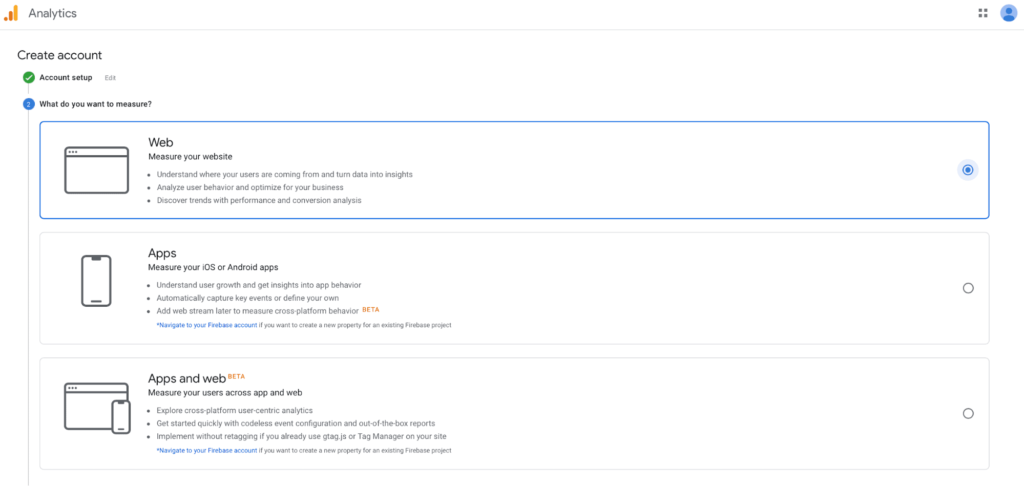
Choose the Web option to begin analysing your website:
Then, Property Setup to add your website link, URL, Industry category and Reporting Timezone:
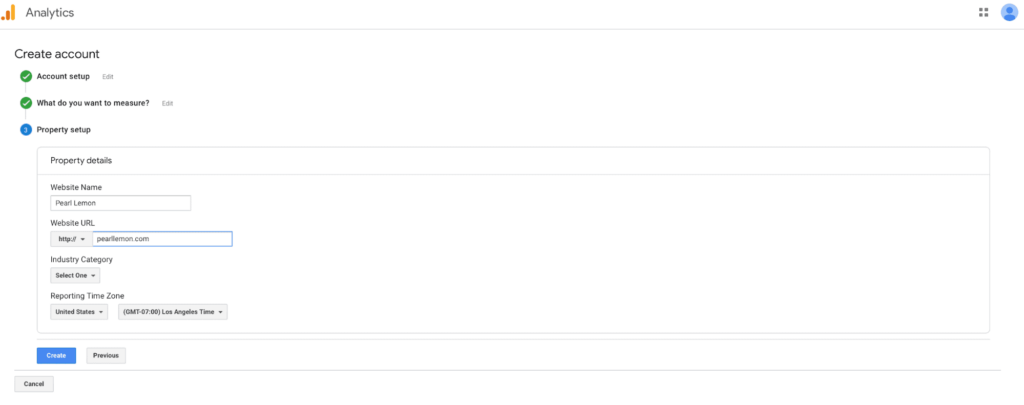
And finally, connect your website to your new Google Analytics account by adding the tracking code to your website. After successfully creating your account and adding a new property, you’ll see this screen with your Google Analytics tracking code on top:
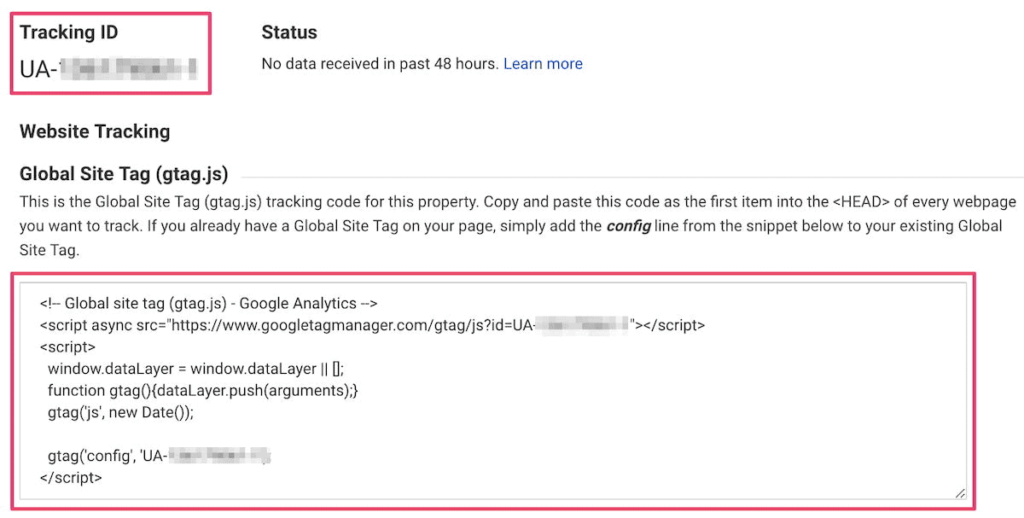
Photo Credit: yoast.com
The above code needs to be added to the website.
The easiest way to do this within WordPress is by installing a Google Analytics plugin such as the MonsterInsights Plugin for WordPress. Installing this plugin, you don’t need to touch the actual code of your website to connect with Google Analytics. You simply install and activate the plugin, insert your tracking ID, and you’re set!
However, if you’re tech-savvy, try using Google Tag Manager or to add the tag manually to the head of every webpage.
And you’re done! Your website is now connected to Google Analytics, and it will start collecting traffic data!
Google Search Control
Google Search Control is another recommended tool which will drastically improve your SEO, given you use the gathered data effectively.
Unlike Google Analytics, which is user-oriented, and provides data related to those who visit and interact with your website, Google Search Console is search-engine focused, providing tools and insights that can help site owners improve visibility and presence in the SERPs.
Here is how to create an account:
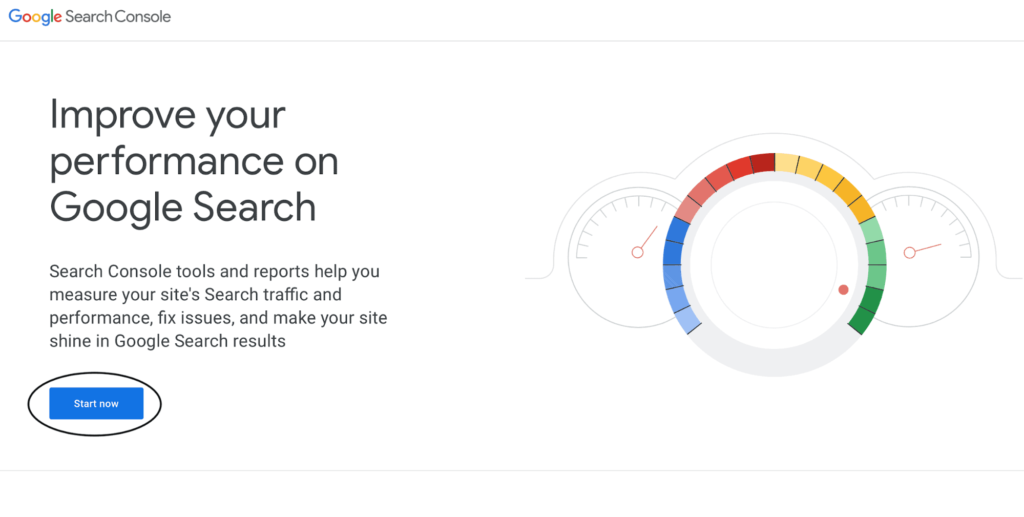
Click on Start Now to create or sign in to your Google Search Console account.
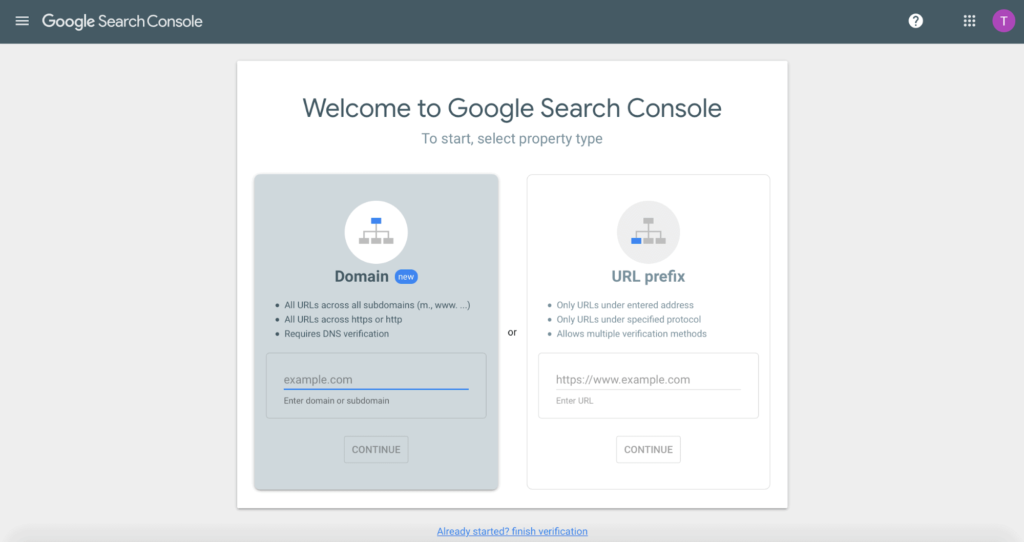
Next, choose a Property Type. Usually, the Domain option is the most popular one since it shows all URLs under the domain name, including all protocols, subdomains, and paths.
However, if you want to restrict data to a specific URL such as domain.com/subscription, URL prefix is the better option. This adds only URLs under a specified address and protocol (i.e., HTTP/HTTPS, www/non-www).
Finally, click on the “Start verification” button.
After the verification process is successful, you should see a message like this:

Photo Credit: ahrefs.com
After connecting your website to Google Search Console, it will start collecting data about the performance of your website.
Submit a Sitemap to Google Search Console
XML Sitemaps are important for SEO because they make it easier for Google to find your site’s pages—this is important because Google ranks web pages, not just websites.
To add the same on Google Search Control, choose “Sitemaps” from the menu, paste the URL of your XML sitemap into the box labelled “Enter sitemap URL,” then hit “Submit.”

Photo Credit: webdesign.tutsplus.com
Follow the verification steps listed and choose the ‘HTML tag’ method. From there, jump over to the Yoast plugin: SEO > General > Webmaster Tools.
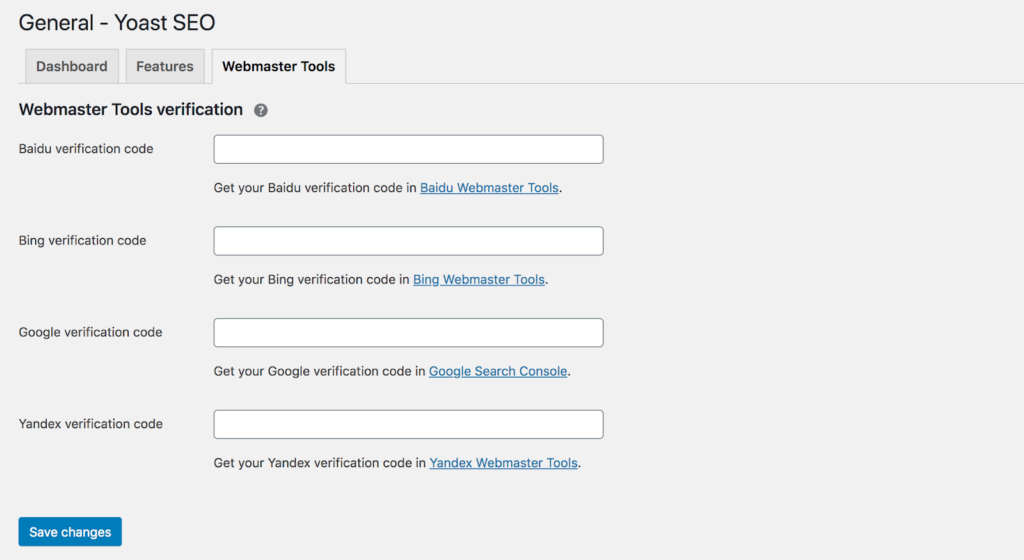
Photo Credit: semrush.com
After submission, you should receive a message like this:

Photo Credits: ahrefs.com
Enable Content Caching
Content caching is the temporary storage of files on servers that are physically closer to end-users. By saving static versions of your posts and pages, browsers can then load them fast, drastically improving your website load time!
Numerous plugins are available, one of which is W3 Total Cache, which we’ve already discussed here.
To activate it, hit Performance > General settings on the left sidebar.
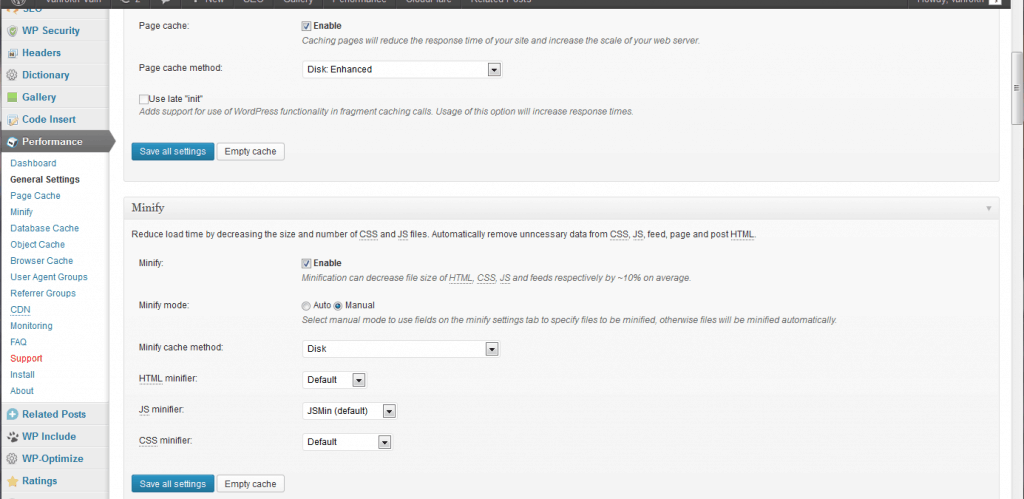
Photo Credit: vahrokh.com
To keep it simple, tick enable on Page Cache, Minify, and Browser Cache.
‘Noindex’ and less-valuable content and using ‘nofollow’
Certain times, your website may contain content that would help your viewers if they were looking for additional resources related to a particular topic, but you wouldn’t want them to pop up in Google’s search results.
An important note here is that Yoast sets “post format” and “media” pages to “noindex” by default. You’ll need to change the settings for tags pages. To do that, go to:
SEO > Search appearance > Taxonomies:
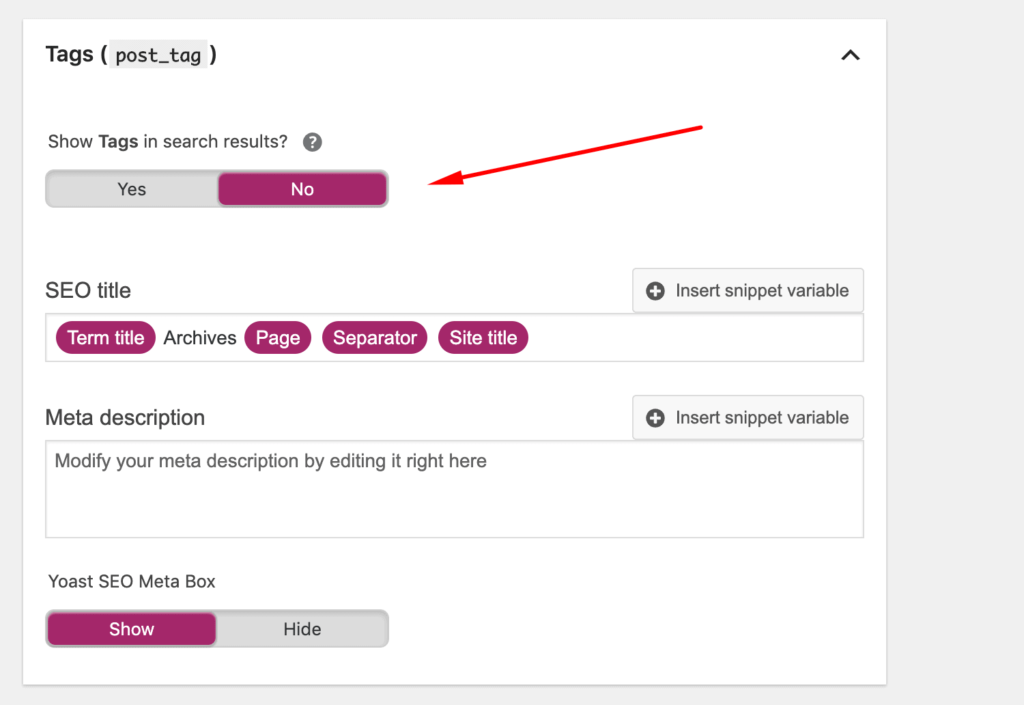
Photo Credit: themeisle.com
Switch the “Show Tags in search results?” option to “No.”
‘nofollow’ on the other hand, can be used for the instances when you do not want the search engines to count some of the backlinks to other pages as “votes” in favour of that content.
The primary reason behind adding ‘nofollow’ is to avoid problems with search engines believing that your website is selling influence or is somehow involved in schemes deemed as unacceptable SEO practices.
A ‘nofollow’ is accommodated as such in a link:
<a href=”http://www.pearllemonclients.com” rel=”nofollow”>Clients</a>
To add this go to Posts > All Posts and select your chosen post and click Edit.

Photo Credit: blogheraway.com
Enable Breadcrumbs
Breadcrumbs are links that allow a user to track their path from the page they are currently viewing to the homepage of your website. They appear close to the top of your page and reflect the structure of your site.
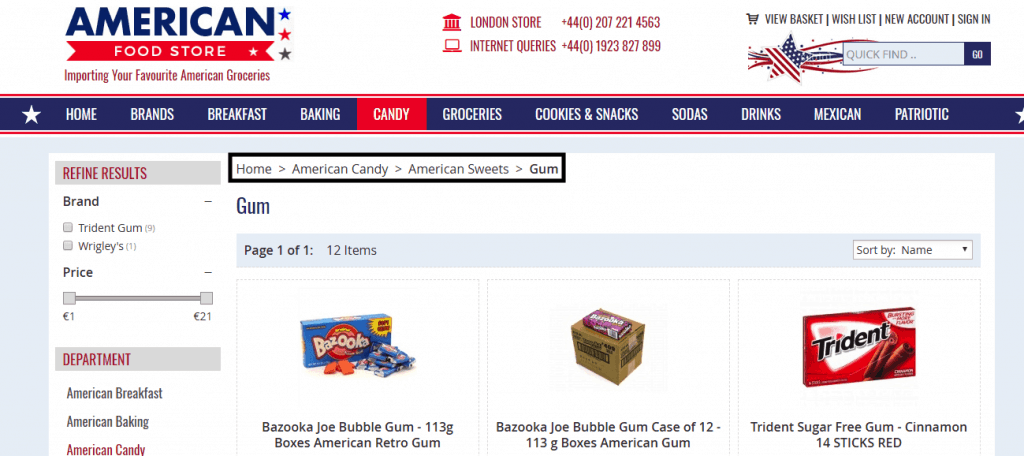
We recommended using breadcrumbs across your website since:
- They help search engines understand the structure and hierarchy of your site
- They create a good internal linking structure
- They’re helpful to users
- They appear in Google search result
And when we say appear in the Google SERPs, we mean in this format:

In essence, it does add extra information about what the website offers, but beyond that, its contribution towards SEO is debatable.
To activate, go to the plugins section on your dashboard (Plugins > Yoast > Activate) and hit the SEO menu item on the left sidebar. Then go to:
Search appearance > Breadcrumbs > Enable breadcrumbs

Photo Credit: marketers delight.com
It’s also important to note that your WordPress theme must support breadcrumbs for this to work since not all of them do.
Set Up Custom URLs
Let’s get a quick vote on this:
Would you rather have a URL that looks like this:
domain.com/blog/the-20-best-protein-powders-for-men-to-buy-in-2018-updated-sept-2018
Or this:
domain.com/blog/best-protein-powder/
Well, to state the obvious, the second, untruncated URL is definitely the wiser option because of its precise, enticing, yet informative structure.
It is important to not ignore or overlook such elements of your website since a poor, uncustomized URL can affect your click-through rates which ultimately would be leading to fewer organic visits.
In WordPress, lucky for you, customizing the URLs is a two-step process:
Just go to Posts > Edit Category and edit your custom permalink.

Photo Credit: wpbeginner.com
Optimise and Organise the Site Structure
The primary reason for an organised site structure is to allow your users and the search engines to navigate your site.
Below is an example of an ideal site structure:

Photo Credit: tomdonohoe.com.au
Abiding by the above hierarchy will definitely bring order to chaos, making it user friendly and ready to be indexed by Google.
Add Schema Structured Data
By describing your content in code, you can make it instantly clear what that particular piece of content is about. In other words, this is what structured data is. Buy adding FAQ or how-to content; you can achieve a clear structure for your website; much like a dictionary for search engines.
Having the Structured data in Yoast SEO plugin option makes it super easy for you to optimize your site for the same.
The plugin automatically generates codes which search engines use and need to make sense of your site and its connections.
Go to SEO > Search Appearance, make a couple of choices and build specific types of content pages with structured data blocks, i.e., help you build specific pieces of content and automatically add the structured data that piece needs to get rich results in search engines.

Photo Credit: yoast.com
Connect Content with Internal Linking Structure
Contextual link building or links that are surrounded by text in the body of content often have a higher SEO value than links that appear in the footer or sidebar.
Therefore, it is recommended that you set up an internal linking structure which points your users to related content on your website. For example, if you run an eCommerce store selling whey protein, you could link articles or blogs uploaded on your website, highlighting the benefits of taking the same on the product view page.
This way, the consumer is interacting more effectively with your website by viewing not only the product but related or contextual articles through the process of internal linking.
Moreover, always use anchor texts which accurately describe the page you’re linking to. This provides users and search engines with the context they need to assess whether the link is useful. The internal linking tool in Yoast SEO Premium helps you connect your content by suggesting relevant links.
Manage Categories and Tags
WordPress uses taxonomies (orderly classification) for content grouping. While the most common, default taxonomies in WordPress are categories and tags, it’s also possible to create a custom taxonomy.
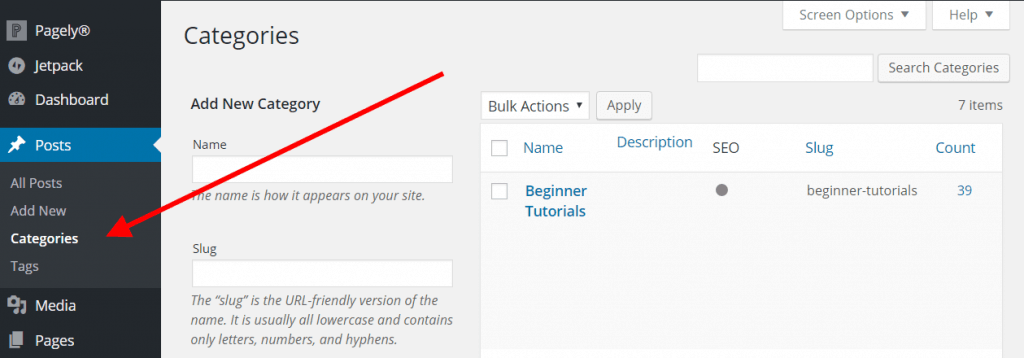
Photo Credit: themeisle.com
Generally speaking, categories allow you to broadly group post topics, while you can use tags to describe your post in more detail.
Categories allow you to structure your website under very broad topics such as ‘Blogs’ or ‘Testimonials’, ‘Products’ etc. Maintaining a limited set of categories, you can keep your website, and your content focused. However, you might want to dissect the content even further, going to more particular groupings. For that, you should use tags.
Therefore, when setting up your website, picking a number of main categories and adding them to your menu can be a good idea. Besides, consider using category pages as landing pages, especially for eCommerce sites as a marketing tactic.
Managing Archive Pages
Essentially, archive pages contain a list of the posts and pages within a certain category or tag.
The archive page looks like the index page, except it’s filtered in some way, such as by WordPress category, tag, date, or author. However, the archive pages generated by WordPress don’t exist as a Page or Post that can be edited.
Often these archive pages need to be maintained and managed to avoid SEO problems such as instances where crawlers index these pages.
To avoid this, go to:
SEO > Search Appearance, where you’ll find the following options on the “Archives” tab:

Photo Grid: seo-gold.com
This way, you’ll never land on page two of an archive on our site from the search engines.
Add Internal Links
Search engines assign each page on your website a score aka, page authority. The recipe for this score is kept secret so that people cannot manoeuvre the results. However, the most common signals of authority are links.
The best part about internal linking is that not only does it allow you to considerably tip the page authority in your favour but also allows your visitors to peruse through the website through contextual linking, which allows for maximum audience engagement.
You can add internal links to posts and pages in WordPress using the WYSIWYG editor.
Highlight the text that should form the link, then hit the “Insert/edit link” button. Paste in the URL of another page or post on your website, and you’re done!
However, the more important question becomes, which pages should you add internal links to?
Using our FREE Seo Audit tool, we will present you all working posts and pages that a) aren’t a part of the page archive, and b) have fewer than three internal links and shortlist the pages that could use a boost.
Use AMP
Amp or Accelerated Mobile Pages is a 2015 initiative by Google and some major publishers which allows for fast mobile pages and does so by stripping some of the design.
Since AMP optimises your website for the best user experience by providing super-fast load times, definitely consider implementing the same on your page by validating your AMP pages frequently.
For your WordPress website, check out the official AMP plugin which adds an AMP version of your website after installing the plugin.
Install the AMP plugin
Upload the folder to the /wp-content/plugins/ directory.
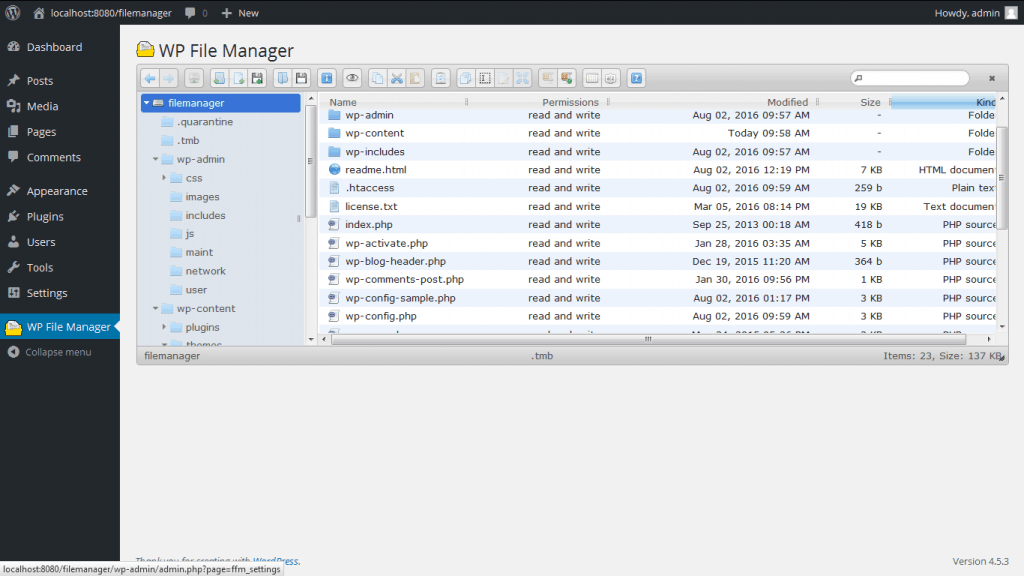
Photo Credit: wordpress.org
Activate the plugin through the ‘Plugins’ menu in WordPress.
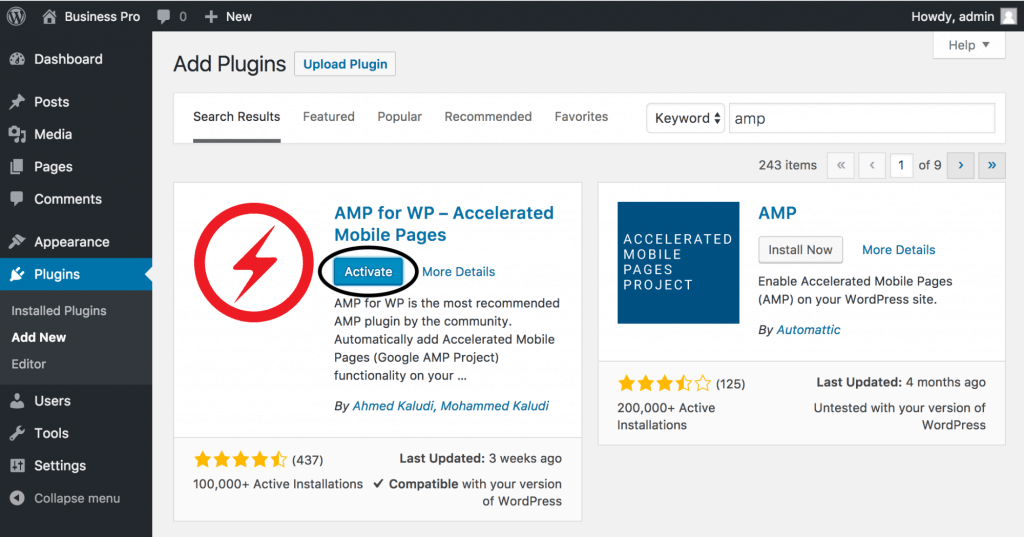
Photo Credit: docs.seothemes.com
If you currently use older versions of the plugin in Reader mode, it is strongly encouraged to migrate to Transitional or Standard mode.
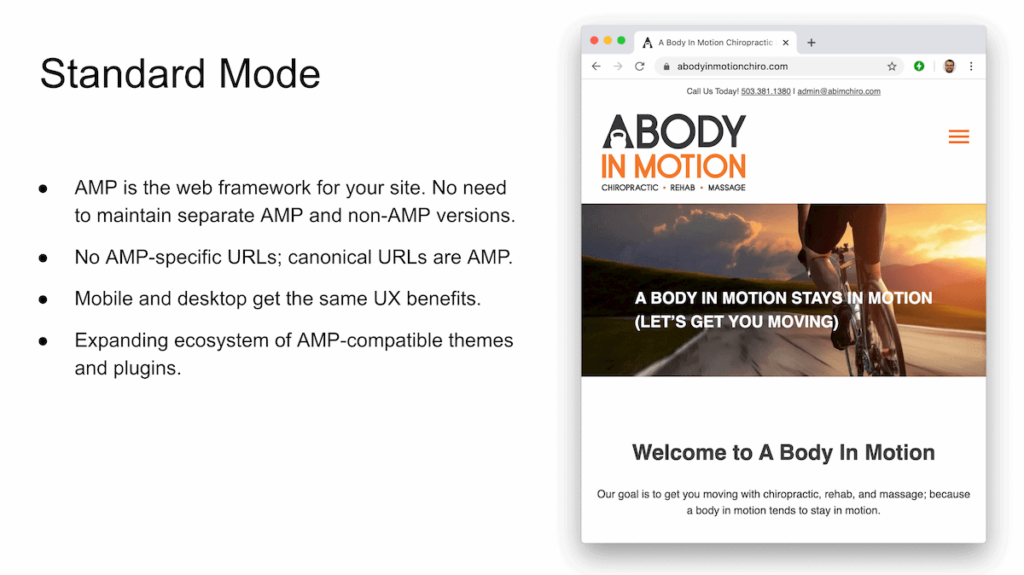
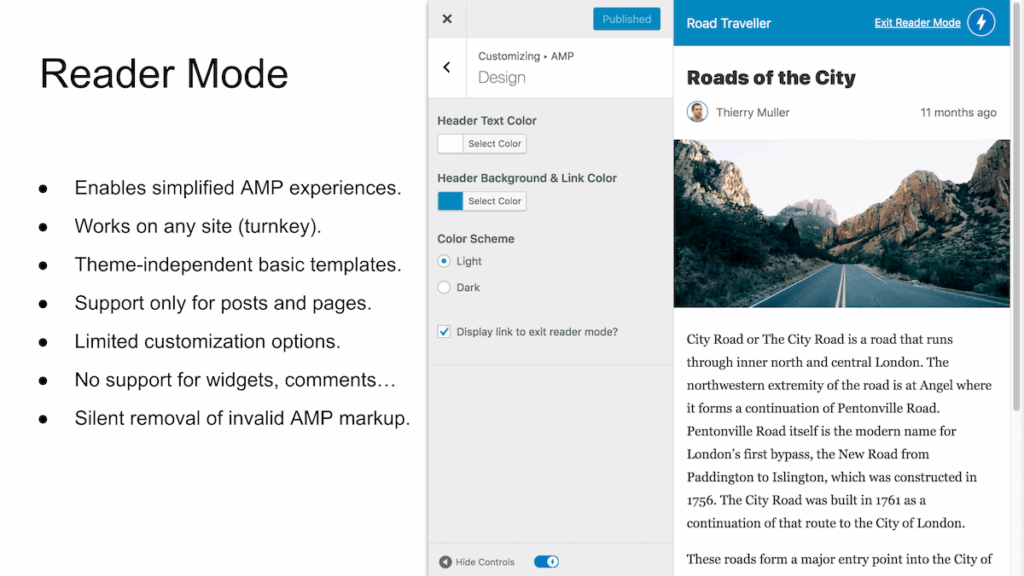
Photo credits: wordpress.org
Fix Duplicate Content
Duplicate content is very detrimental to your SEO efforts, and Google does not appreciate it.
The most typical duplicate content issues arise when search engines encounter multiple URLs with the same or very similar content. As a result, search engines don’t know which of these URLs to rank higher, resulting in lower rankings for all of them.
The first step to avoiding duplicate content issues is to first identify pages which reflect the same and use the following methods to overcome them.
But how do you do that?
Using our FREE Seo Audit tool, we will present you all working posts and pages that include duplicate content and even near-duplicate landing pages.
Noindex
Noindex is the most convenient option as it restricts crawlers to index the duplicate pages which do not add much value to your audience.
Canonicalizing
Canonicalization is the process of picking the best URL when there are several choices, with the intention of specifying a preferred version of a web page.
This can be done through Yoast or by adding the following code within the <head> section of the page:
<link rel=”canonical” href=”https://example.com/wordpress/seo-pl
Yoast is proficient at implementing both options on a page-by-page basis.
Select “No” from the top drop-down to “noindex” a page or post. Or paste the URL of the preferred version into the “Canonical URL” box to canonicalize.
That simple!

Photo Credit: wplounge.org
Flaunt Local SEO
Highlighting your location in the domain might help you acquire more traffic through local SEO. Your location can be incorporated into the domain name as its extension, in place of the more common “.com.” such as “co.uk” to appeal to your target audience.
Another important aspect of Local SEO is associated with choosing the right domain. While “.com” is certainly the most common extension out there, there are many other options that can serve different needs for different websites.
There are many available domain extensions, ranging from the quirky (like “.guru”) to the explanatory (such as “.tv”). Here are just a few of the major domain extensions explained:
.org:
Short for “organization,” this domain extension is most often used for non-profit and charitable organizations. For example, wikipedia.org.
.net:
Literally referring to the Internet itself, this extension is commonly used by online businesses, startups and other high-tech applications and services. For example, behance.net.
.info:
This extension is an abbreviation for “information” and is generally used for informative or educational sites.
.me:
An extension that’s highly fitting for resume websites, blogs, portfolios, and personal brands.
Local extensions:
As previously mentioned, this type of extension shows off your physical whereabouts and might give your local SEO a boost. A few examples include “.de” for Germany, “.fr” for France, “.co.uk” for the United Kingdom, and more.
WordPress SEO Content Recommendations
Apart from the technical ways to improve your WordPress SEO, the way you present your content online plays an equally important role.
Compress and optimize your images
An average webpage is usually of 3MB; however, long-form blog posts tend to be much bigger because they contain lots of images.
Moreover, the average global mobile download speed is 20 Mbps, averaging a load time of around 4 seconds, and according to Google, 53% of mobile site visitors leave a page that fails to load within three seconds.
Remember us mentioning Smush Image Compression and Optimization plugin? This is where the plugin comes super handy.
This application compresses and optimizes all images on your website, even the ones that you upload in future.
To compress the images you’ve already uploaded, hit the Smush menu item on the left sidebar and hit “Bulk smush now.”
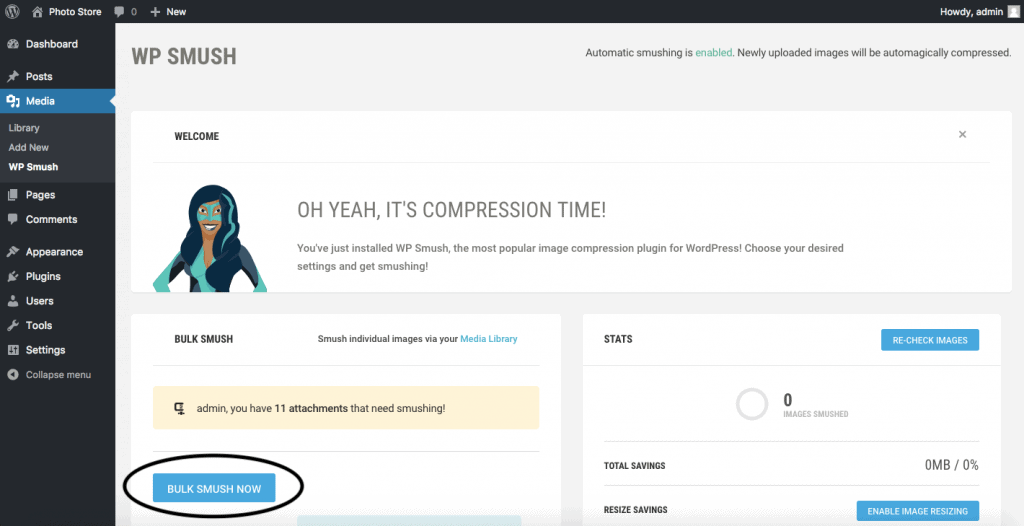
Photo Credit: hostpapasupport.com
This will optimize your images in bulks of 50, which you can re-click to compress the next 50.
Next, consider turning on Image Resizing:
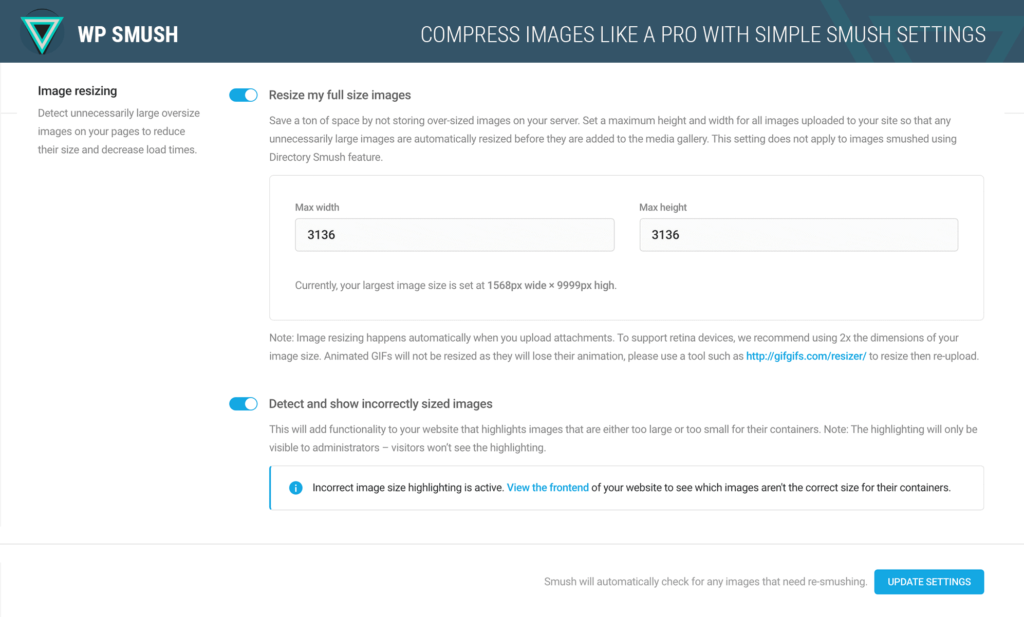
Photo Credit: wordpress.com
Change the dimensions according to your WordPress theme, and you’re done!
Add Alt Text To Your Images
Did you know that 8.1 million Americans have a vision impairment and may use screen readers?
As visually impactful images make your website content, it is equally important to caption them or add alternate text to enhance the user experience. Search engines tend to perceive websites with optimized images as more polished and grant them with a better overall ranking.
More importantly, captions are important since they boost rankings in Google Images, which ultimately is a great SEO move.
Hence, complementing images with captions helps Google to understand what’s on your photos, graphs, and other pictures and ultimately drives more traffic to your site.
To do this, hit Add Media > Upload files and add an Alt Text, as shown below:

Photo Credit: wordpress.stackexchange.com
Fill in the alt text field with a short description of the image. Keep it simple, accurate and avoid bombarding it with keyword-heavy texts.
Research What Your Audience Wants and Needs
Before beginning to write a blog or article on your website, you should think about what search terms you want to be found for and work towards optimizing every page or post for a specific keyphrase.
Keyword research is the most important step towards your SEO efforts. Not only does it lay the foundation of all of these other digital marketing practices, but it also helps you drive organic traffic to your website.
More importantly, you need to intimately familiarise yourself with the niche you wish to enter. It’s only with a true understanding of the same, can you identify an element which will give you an edge over your competitors.
Another very interesting way to research or discover what people are looking up on the internet is to enter your domain of specialization on the Answer The Public platform. This is a very insightful tool as it shortlists the most frequently asked questions filtered according to your domain of query and prepares a list for you to check out!
We will introduce the best tools to help you with the keyword research and move on to the second part of the keyword research: long-tailed or short-tailed?
The Best Keyword Research Tools
As much as organically thinking of effective keywords may help, using tools such as Google Analytics, Moz Explorer, or SEMRush may come in handy in your keyword hunt.

Photo Credit: PageUp.com
These tools tell you exactly how many people are searching for specific terms each month. They also suggest terms to use and can tell you if a keyword is very competitive.
Google Keyword Tool
Apart from being a free SEO tool, Google Keyword Tool is owned by by- Google. The only condition for using the tool is to run an AdWords campaign on Google. If you do want to set up an AdWords campaign, however, you can then use the Keyword Tool to access monthly search numbers for a specific term nationwide, in your state, or even in your city.
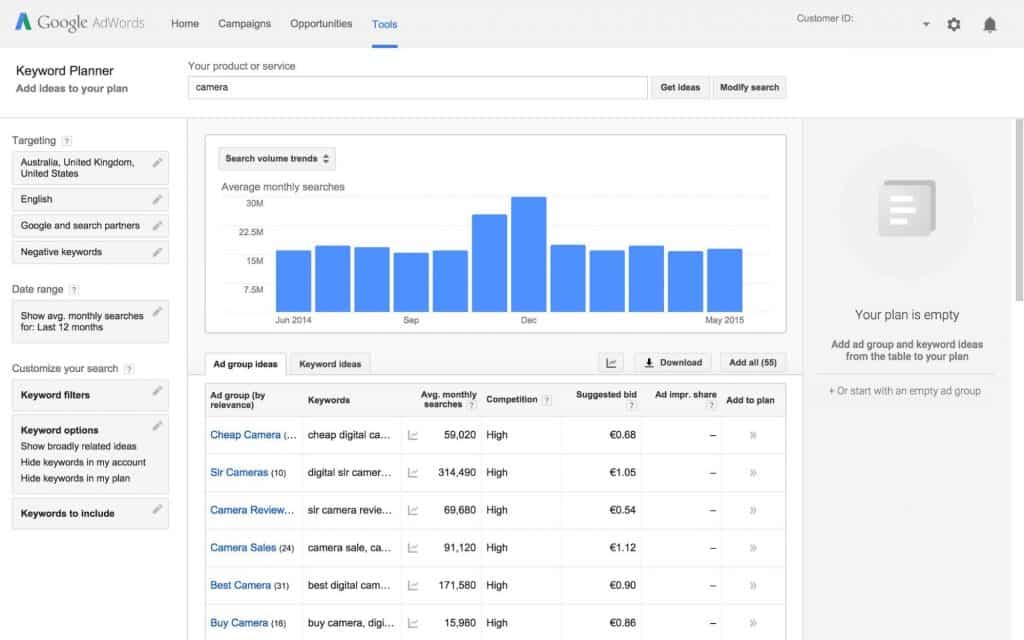
Photo Credit: SirenSearch.com
Moz Explorer
While the Moz keyword tool only provides nationwide search data, it is excellent at recommending phrases that you may not have thought of. Its ability to suggest longer tail (more than 3-4 words) keywords with lower search volumes make it a great choice for small businesses.

Photo Credit: HookAgency.com
Moz charges a monthly fee, but you can try it out free for 30 days. (And that should be more than enough time to get all the data you need.)
SEMrush
In addition to getting keyword data, you can also use it to find out how your competitors are ranking. (Just enter their Domain, click on Organic Results and click on Positions) SEMRush only gives you one day to try out their tool and then you’ll have to pay.

Photo Credit: SeerInteractive.com
While writing content, you can also download the SEO Writing Assistant plugin, as it allows you to ensure that you’re writing in an SEO-friendly style, provides recommendations:
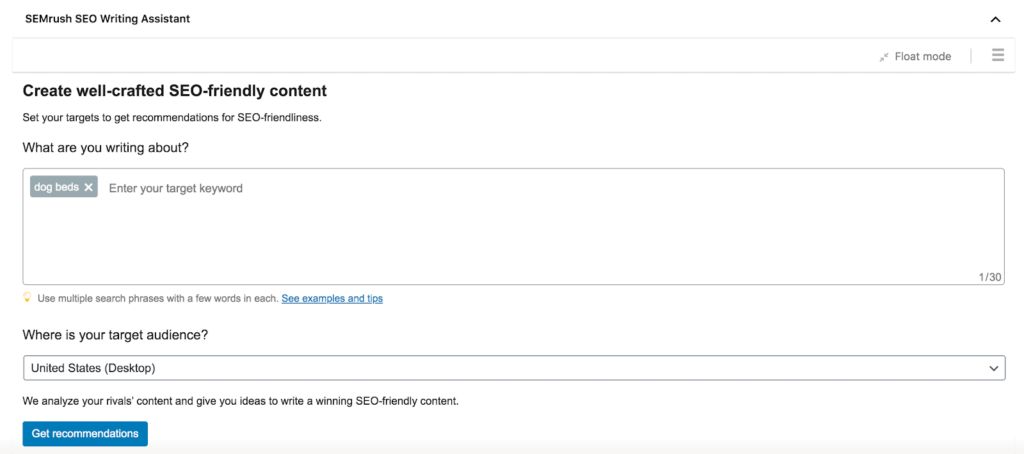
Photo Credit: semrush.com
And an analysis based on your Google top 10 rivals for a given keyword:
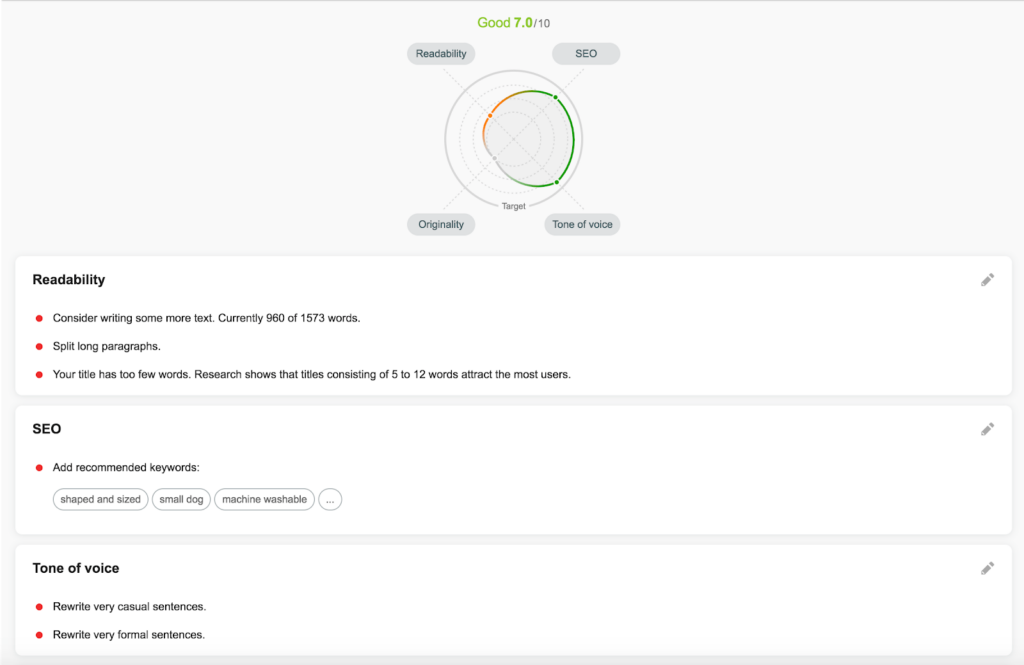
Photo Credit: semrush.com
Long-Tail or Short-Tail Keywords?
Keywords are two to five-word phrases that your potential clients would type into a search engine when looking for you (or a business like yours.)
We most definitely recommend using long keywords mainly because of the drawback of shorter ones: you tend to compete with billions of results. For example, if you are an online e-commerce company selling headphones, you would want your searchers to type in “best headphones”.

Photo credit: OnCrawl.com
However, adding such small keywords would generate millions of results and is very likely to rank your competitors higher who have been in the industry much longer.
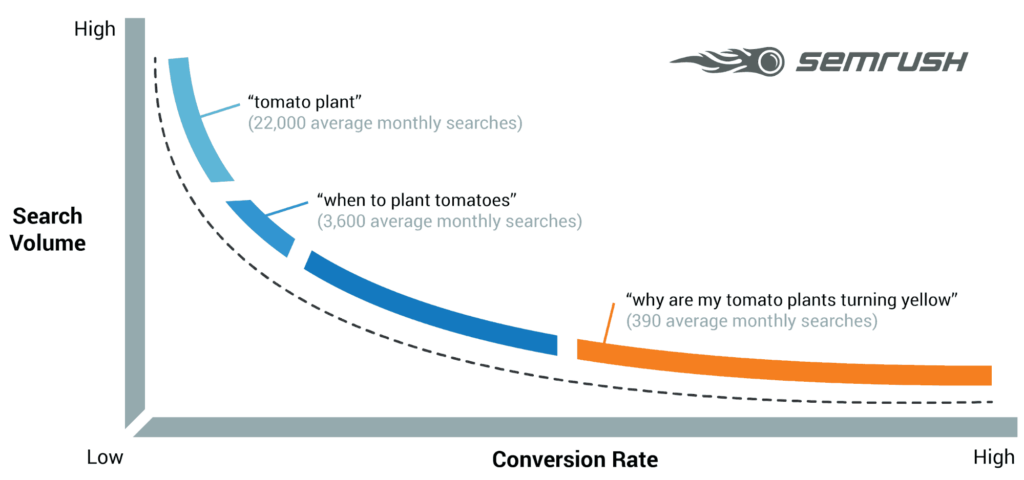
Photo Credit: semrush.com
This is why using longer keywords helps, as it allows your business to boil down to certain key features such as “best headphones in London” or “best headphones under £15”.
The more targeted your keyword, the better, as you’ll be able to attract the right audience and increase the chances of searchers clicking on your website from search results.
At Pearl Lemon, we have carefully selected the most effective ways to help you find the keywords for your website.
One of the best ways to rank high is to make sure you find the right keywords for your business and to use these words in the text and other elements of your website.
Optimise Individual Posts, Pages, Title Tags and Descriptions
Each webpage on your website has elements which can be optimized to gather the maximum organic traffic.
These elements include your subheadings, your title, and your meta description, and all of these need to reflect the topic of the specific post. More importantly, these elements are what your audience is going to see in the search results.
The best way to optimize them is to customize them for every page and post by adopting the following facts:
Make them exciting to read: A higher click-through rate leads to more traffic from search engines.
Keep them precise yet informative: Google starts truncating titles at 590px (~50–60 characters). Meta descriptions get truncated after about 930px (~155 characters). Use SERPsim to preview them before setting them live.
Yoast too allows you to customize titles and descriptions on a page-by-page basis.
Scroll to the bottom of the post or page you’re editing and expect this window:

Photo Credit: yoast.com
This Edit Snippet option allows you to write your title and meta description.
Maintain Quality Content
Google strives to show its users the best and up to date information, which is an incentive strong enough for you to keep your content fresh.
However, if you have always been an active user with hundreds, or even thousands, of blog posts, running a proof and fact check on all your content is far easier said than done. In this case, we recommend focusing on two specific areas when it comes to content maintenance: updating cornerstone content and preventing keyword cannibalization.
Update your cornerstone content
Cornerstone content or the content that makes up the core of your website consists of the best, most important articles on your site, i.e., the pages or posts you want to rank highest in the search engines.
Therefore, given the importance of cornerstone content, always begin with updating this section of your website. Remember, your business relies on them, and they should never go stale!
Here is where Yoast comes in super handy- on your site, you can mark a post as a cornerstone article. In doing so, these articles will undergo a rigorous SEO analysis which appears in a separate list in your post overview, which makes it easy to browse through them and check if they’re still up to scratch.
On Yoast Premium, the Stale cornerstone content filter only shows your cornerstone articles that haven’t been updated in the last 6 months. You’ll find this filter in your post overview. If it doesn’t show any posts, you’re good, and if there are one or more posts in it, make sure you check and update them!

Photo Credit: yoast.com
Keyword Cannibalization
Keyword cannibalization refers to being unable to enter a booming ranking game by creating too many articles for the same or similar keywords.
Having a dozen articles on the same topic confuses the search engines as they are unable to understand which articles they should rank among the highest. As a result, you’ll be competing with your own articles for a high position in the search engines.
In this case, it’s recommended that you:
- Find out for which keywords are causing cannibalisation;
- Analyze which content performs best for those keywords;
- Keep the best performing posts;
- Decide if you should merge the other posts into the better performing one;
- Or just delete and redirect them.
Optimize WordPress Comments
Often there have been instances where spammers submit comments with bad links which could negatively affect your search rankings.
To avoid the same, we recommend using Akismet. This tool is a spam filtering service that filters spam from comments, trackbacks, and contact form messages and happens to be one of the two plugins that come pre-installed with every WordPress site.
On the flip-side, however, a highly engaging website with an overwhelming amount of comments (spam-free comments) may affect your site speed and split comments into multiple pages.
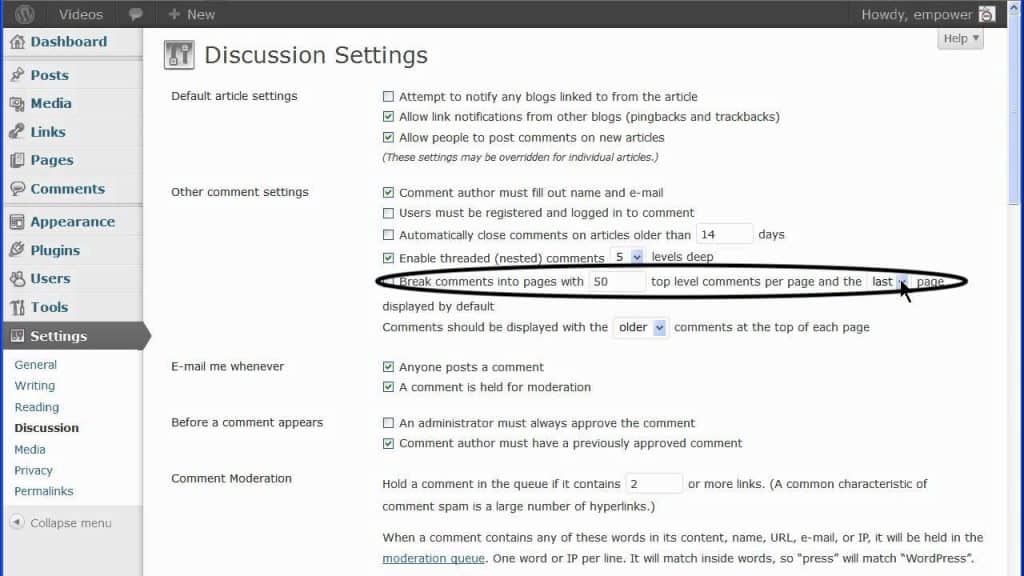
In this case, comment pagination comes in super handy. To do this follow the following steps:
Login to your WordPress admin area and go to Settings > Discussions.
Next, look for the ‘Break comments into pages’ option.
From here, enter the number of comments you want on each page, and how you want to display them:
Click on Save Changes, and you’re done!
You can now check the result of your pagination, and it should look something like this:

Photo Credit: wpbeginner.com
Full Posts vs Summaries
WordPress displays and links your posts from a number of pages such as home page, category archive, tags archive, date archive, author pages, etc.
Moreover, by default, it shows the full article content, thereby making them visible on pages they have been linked to and the location on your website they actually exist.
This often harms your SEO since search engines often consider it to be duplicate content, and slows down the website load speed.
However, there is a very simple way to combat this- display summaries or excerpts instead of full articles:
Hit Settings > Reading and select the Summary option under ‘For each article in a feed, show’.

Encourage Engagement
Do not step back from being explicit about your requests from your audience. The best way to gather more impressions is to ask people to interact and share your content; so make sure you are vocal about it!
The best way to do the same is to write in a way that is going to encourage action- ask your readers for their opinion. Then respond to these comments in order to keep the conversation going and build a relationship with your readers.
Engagement also boosts your SEO, as it shows that your site is active.
Create a Mailing List
Adding a mailing list will definitely add an edge to your site, and it’s often a good idea to invest in a mobile-friendly digital newsletter.
Make sure that you add a subscribe field beneath your posts and on other visible places on your website, but most of all, make sure your newsletter is truly something unique!
WordPress offers the Newsletter plugin for your WordPress blog, which provides unlimited subscribers with statistics and unlimited newsletters with tracking, among many other perks.
Use the WYSIWYG editor
The What You See Is What You Get Editor organises your site content so that visitors have a good sense of where a content topic begins and other ends, which ultimately provides a great user experience.
But how do you achieve this? By simply breaking things up with HTML formatting.
Using the WYSIWYG editor, you can:
- Create a clear hierarchy with Heading tags (H‑tags for example, H2, H3, etc.);
- Use unordered and ordered lists (where appropriate);
- Draw attention to important copy (bold, italicize, underline, etc.)
Make it Mobile-Friendly
According to recent studies, it’s been found 50% of searches are done via mobile, and this number will only continue to grow. While we can’t change these statistics, we can definitely adapt to it, and with WordPress, it doesn’t get any simpler!
WP Touch
WP Touch is the first tool that comes to mind when we talk about mobile solutions for WordPress.
Its mobile-centric content enhances the site, which makes it faster and easier to read.
The plugin adds a simple theme for mobile to your site, but the overall theme of your website does not change, keeping your content untouched as it simply converts your content for different screens. Your website URL remains the same as well!
The plugin has two options: free and paid:
Free version: You only have access to one mobile theme. Along with this come custom features such as detecting the language, colour changes and special elements to help you match your brand, specific coding and other style options.
Paid version: Offers seven different themes, with a higher degree of customization. WPtouch also has a mobile cache option, which supports images, posting ads and conducting A/B testing.
WP Super Cache
WP Super Cache is not only a five-star rated tool but is free of cost!
To summarise, the plugin helps increase your site’s upload speed, especially during times of high traffic and/or when your web host is slow.
Moreover, this plugin converts dynamic hard to read PHP codes, into static HTML files. And the best part is that the visitors to your site won’t know a difference, even during times when traffic to your website is high.
Auto Optimise
Auto Optimize is one of the best plugins to improve web upload speeds as it optimizes your database, deletes cache, and aggregates scripts.
This plug-in is also free and easy to use, so make sure you take full advantage of it and secure your website!
WordPress SEO Security Recommendations
Each week around 20,000 websites are quarantined by Google for malware, which is “Google Blacklisted” where Google, different search engines and anti-virus companies are marking the website not secure to visit.
Therefore, you need to secure your website from potential hackers or viruses.
Among the multiple software available to us, which ensure a malware-free website, and one of them happens to be Sucuri.
Sucuri
Sucuri has the reputation of being a website security company that specializes in WordPress and protects your website from hackers, malware, DDoS and blacklists.
When you enable Sucuri, all your site traffic goes through their cloud proxy firewall before coming to your hosting server. This allows them to block all the attacks and only send you legitimate visitors.
For a more in-depth analysis on how Sucuri works, check out this blog by one of their happy customers!
Wordfence
Similar to Sucuri’s efforts, Wordfence includes an endpoint firewall and malware scanner to protect WordPress. The Threat Defense Feed arms Wordfence with the newest firewall rules, malware signatures, and malicious IP addresses it needs to keep your website safe.
That’s all folks! Hope your SEO efforts are more organised and target-oriented and resulting in booming business!
Feel free to let us know your opinion or thoughts and of course, let me know once you outrank your competitors!

