The Shopify platform, like many of its competitors like Wix, happens to be a major platform for a range of businesses. Owing to a stat by the BuiltWith usage statistics, we can see that usage of the CMS has more than doubled since July 2017. Currently, 4.47% of the top 10,000 sites are using Shopify.

Photo Credit: moz.com
Moreover, a recent trend of clients using the Shopify platform at Go Fish Digital has been noticed, which further confirms our assumption that Shopify is one of the leading e-commerce companies.
Now that we have proved to you the massive traffic the website receives let’s look at what Shopify SEO really is, facts you should know before getting started, Shopify SEO issues and finally, SEO tips that give your website the traffic you deserve.
What is Shopify SEO
Just as the name suggests, Shopify SEO implies to the SEO improvements that are unique to Shopify. Consisting of several SEO-friendly features, Shopify has many more covert features that could get you ranked high on the SERPs.
Before You Get Started…
Before getting to the SEO tips and tricks we have picked out for you, it’s important you understand and know some key features and adopt the following recommendations:
Paid Plan
It is imperative you sign up for the paid plan since Shopify doesn’t let search engines index stores on trial accounts.
Custom Domain
A custom domain is highly recommended since people are more likely to visit websites such as
besteventplanner.com and not besteventplanner.myshopify.com.
Security
Make sure the SSL encryption sent between your visitors and your store is enabled so that it ensures the users faster page load times, removes mixed content to get more security and better SEO.
Mobile-Friendly
According to recent studies, it’s been found 50% of searches are done via mobile, and this number will only continue to grow. Therefore, use the responsive Shopify themes and test them using Google’s mobile-friendly tester.
Google Analytics
Setting up Google Analytics makes it easier for you to monitor and track your visitors. If you don’t already, learn how to set up the free app to your Shopify here.
Google Search Console
Google Search Console shows what keywords you rank for, amongst a number of other things. Refer to this guide to know how you can go about it.
Sitemap Submission
Submitting your website’s XML sitemap is a great SEO tactic as it allows you to quickly find your essential website pages. Shopify creates an XML sitemap for you at yourstore.com/sitemap.xml, and here is how you can submit it.
Before we move on, there are certain SEO tips which are more technical in nature, require a strong knowledge of coding while others are more general, and can be adopted without much knowledge of the same.
As we start with the technical SEO recommendations, make sure you are backed up by a tech-savvy company/professional, in a lack of which, make sure to book a call with us so that we can set you up with our Shopify SEO professional asap!
Technical Shopify SEO Recommendations
Now that we have mentioned the Shopify basics, there also exist certain SEO issues such as duplicate content. Thankfully, numerous SEO courses are available to help address these challenges. This guide provides you with recommendations on how to overcome these barriers to ranking high and revamp your e-commerce business!
Duplicate Content
Duplicate content occurs when either duplicate or similar content exists on two separate URLs.
This is detrimental for you SEO since it creates issues for your search engines as they might not be able to determine which of the duplicates is the canonical version. (A canonical tag is a way of telling search engines that a specific URL represents the master copy of a page.)

Photo Credit: moz.com
Moreover, oftentimes, link signals are split between the pages, and Shopify has been known to create duplicate content in several different ways through:
- Duplicate Product Pages
- Duplicate collections pages through pagination
By default, Shopify stores allow their /products/ pages to render at two different URL paths:
Canonical URL path: /products/
Non-canonical URL path: /collections/.*/products/
This is to ensure that all /collections/.*/products/ pages include a canonical tag to the associated /products/ page.
While this definitely helps Google consolidate the duplicate content, a more alarming issue occurs within the internal linking structure; by default, Shopify links the non-canonical version to all your product pages.
An example of such is shown below:
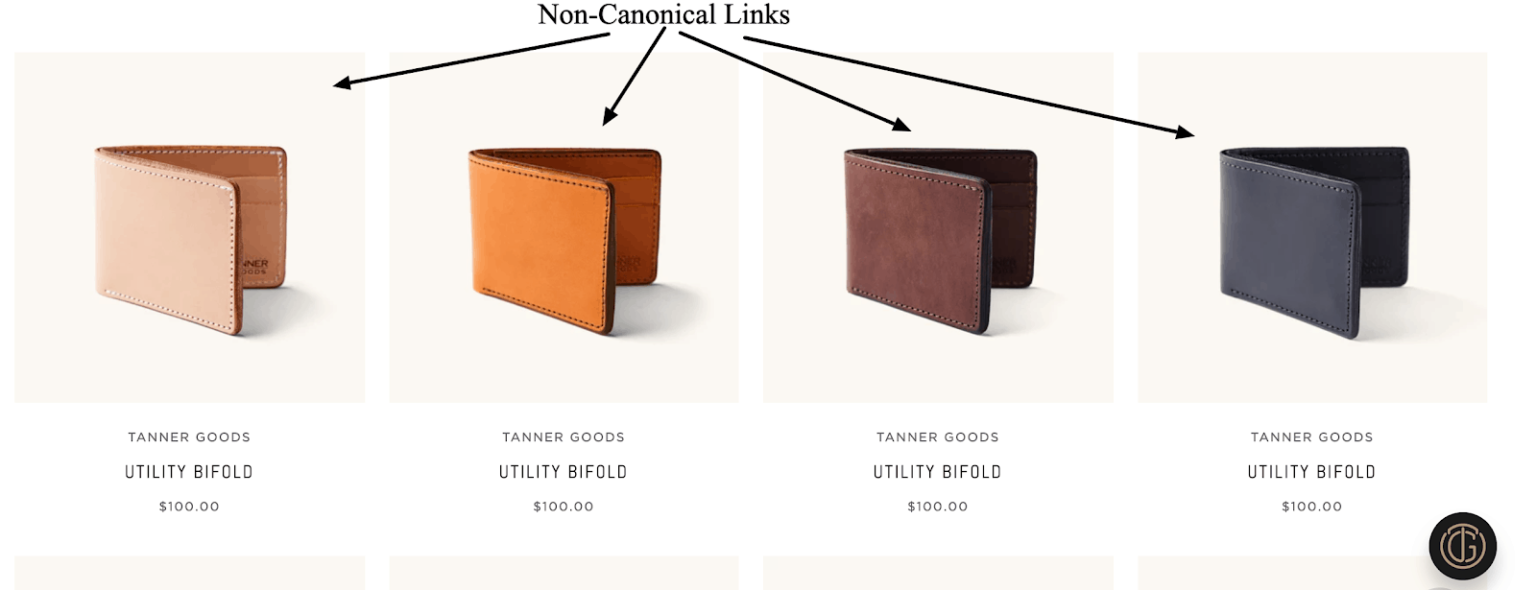
Photo Credit: moz.com
However, this isn’t just limited to /collections/.*/products/ but “swatch” internal links that point to other colour variants as well.
Therefore, as you might have guessed, Shopify creates an entire website structured around non-canonical links by default. This, in turn, causes severe indexing issues by providing conflicting signals to Google.
This, in turn, provides Google with the choice of whether or not the content is duplicate each time that it crawls these pages. Obviously, you would not want such decisions to rest in the hands of Google, but yourself and here is how you can turn those tables:
Adjusting the internal linking structure
The theme.liquid can be thought of as the master template; all other templates are rendered inside of theme.liquid.
Therefore, the change can be made in the theme’s .liquid files that build the links to your products. This will vary theme to theme, but in “Supply” (for example) you can find the relevant line of code in the Snippets section, as “product-grid-item.liquid”.
We’re looking for the link to the products, like this:
<a href=”{{ product.url | within: current_collection }}” class=”product-grid-item”>
The important part is inside the brackets {{ }}. product.url is used to generate the URL for the product, but this also has a ‘within’ filter applied to it.
This within filter makes sure that the link that’s generated includes a reference to the current collection. Seeing as you want the URLs all to point to /products/ you can just remove that filter. So that snippet would like like this:
<a href=”{{ product.url }}” class=”product-grid-item”>

Photo credit: paulnrogers.com
You can also refer to other URL filters here.
Duplicate Collection Pages
Shopify also happens to create duplicate content through the site’s pagination, i.e., a duplicate is created of the first collections page in a particular series. This occurs due to the fact that once you’re on a paginated URL in a series, the link to the first page will contain “?page=1”:

Photo Credit: moz.com
Since “?page=1” will almost always contain the same content as the original non-parameterized URL, we suggest that you adjust the internal linking structure so that the first paginated result points to the canonical page.
Product Variant Pages
It is common to see multiple product URLs created for the same product with slight variations on Shopify. This implies that there can exist multiple duplicate/similar product descriptions and images in situations where a core product on your website is the same but only an attribute such as size.
Here is an example of the same: https://recordit.co/x6YRPkCDqG
Sometimes, however, this duplication cannot be considered an SEO issue since some sites could benefit from these URLs as they allow you to have indexable pages that could be optimized for very specific terms.
To understand the best course of action to undertake for product variations, do consider the following:
Usability
User-centric SEO is not only popular but recommended, and with the goal of providing the best user experience, you could provide all of the colour combinations possible in the same page (using a dropdown menu, for example)
Alternatively, people often shop for a product based on colour.
All in all, the first step is to consider if your product is one where specific colours are important to user happiness.
Duplication of Effort
Writing custom copies for each colour of each product should usually balance out through the possible return on that investment of time and resources.
Creating multiple custom pages might be rewarding in some cases but do end of being a liability if proper maintenance is not provided.
You must track each copy’s server load, maintenance needs, update or redirect if you redesign or discontinue that product or even your shipping operation- for example, does each colour already have its own SKU? (A SKU is a unique code consisting of letters and numbers that identify characteristics about each product, such as manufacturer, brand, style, colour, and size)
Content Duplication
If your Shopify store contains product variants, then it’s worth determining early on whether or not these pages should exist at a separate URL.
To avoid search engines crawling your webpages and indexing them as duplicate content, it is advised that you write specific content for each colour of your product.
However, this is feasible for websites that are selling a product which consists of over 500 colours, and under such circumstances, you could:
- Add colour options next to the same core product. In this case, the URL doesn’t change, and you never even encounter a specific page for the other colour, although it exists.
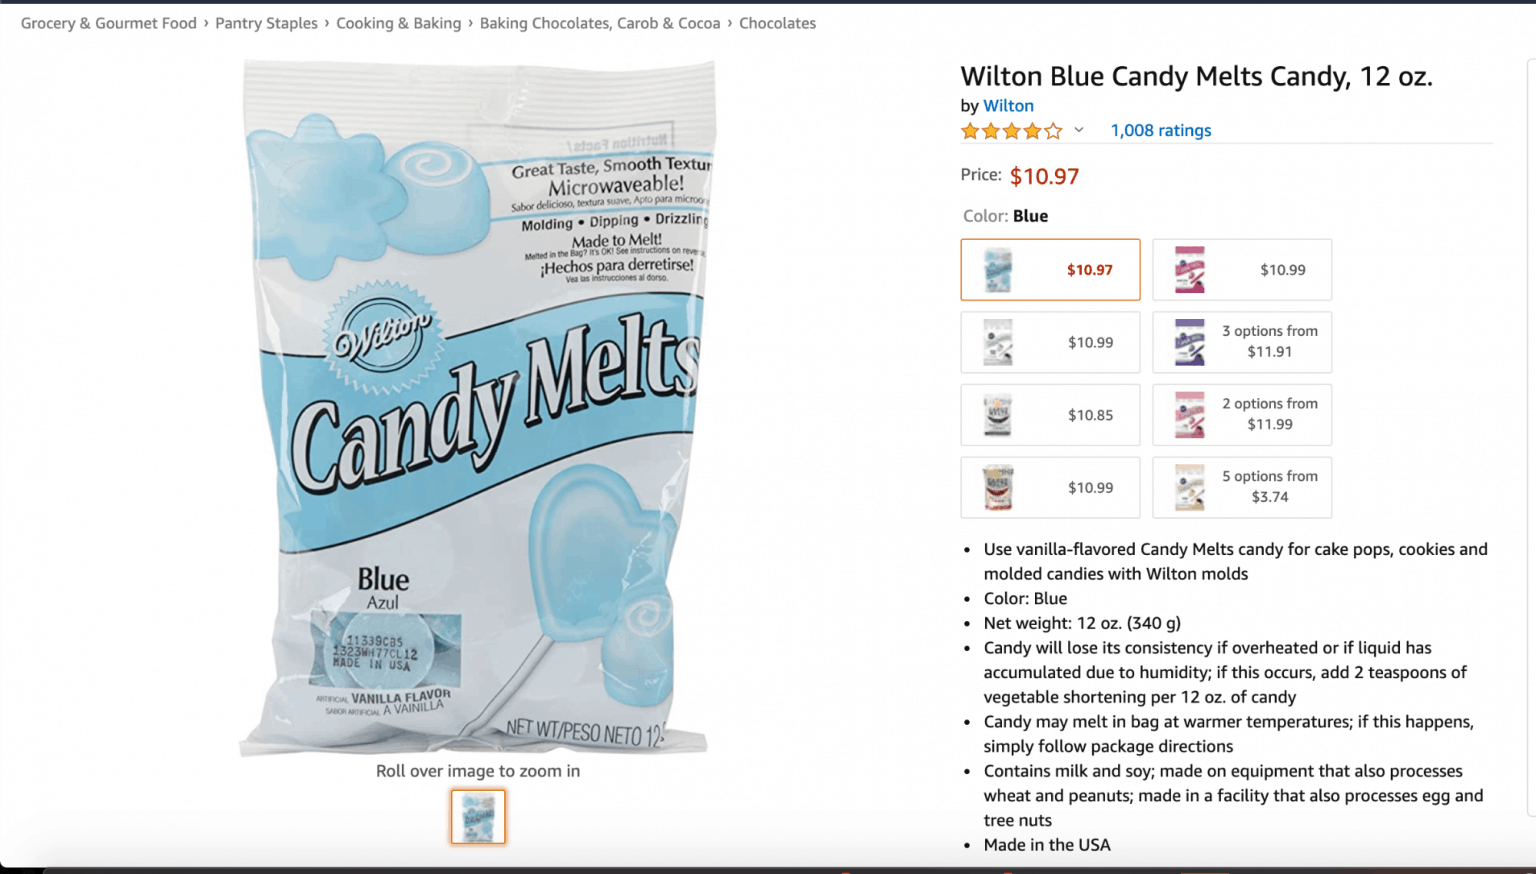
- Add a colour selector next to the same core product, but when you select another colour, the whole page reloads to the other colour page.
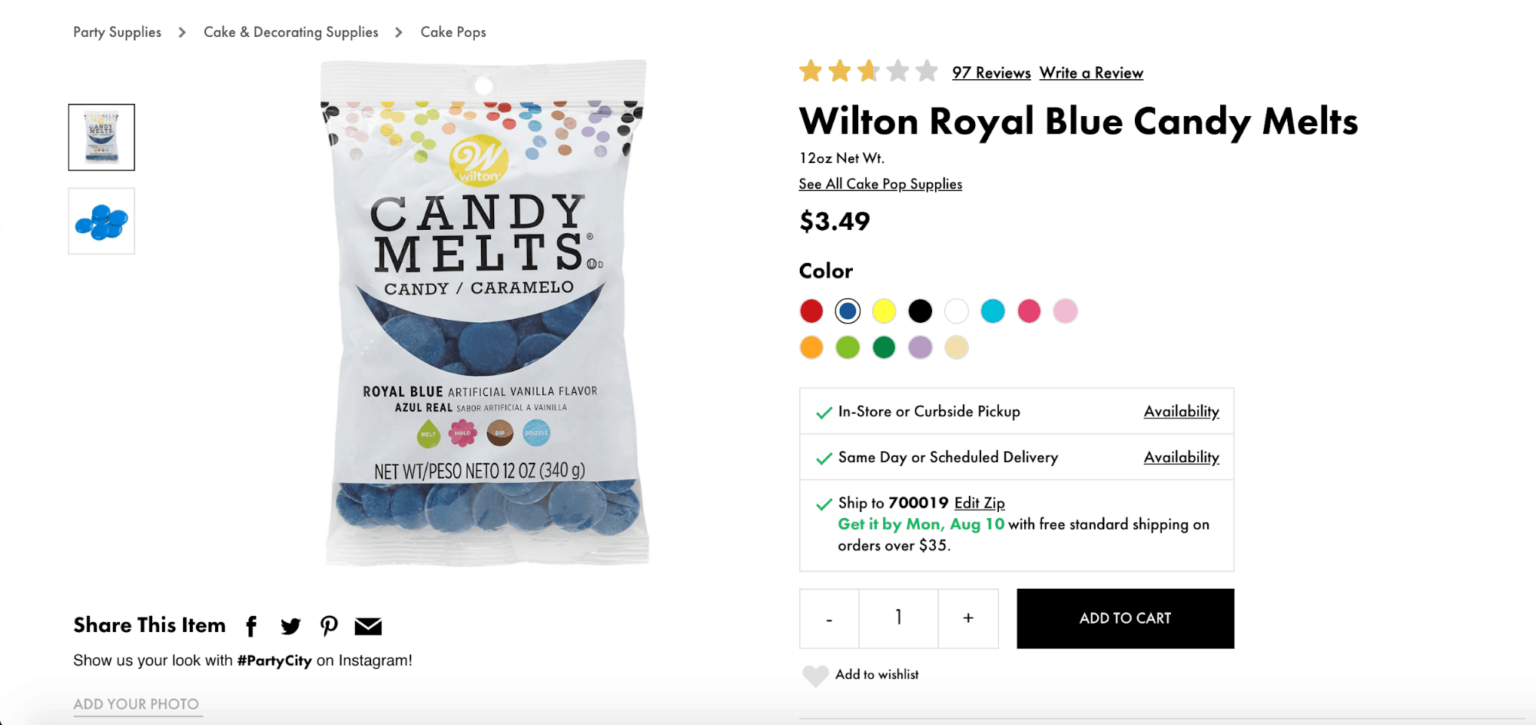
However, the content on both sites is almost identical except for switching out the colour name in the content, for example:


Google doesn’t really mind this duplication since it’s honest’, and it understands that artificially inflating the value of multiple pages is not the website owner’s intent.
Note that it is possible to rank higher on the SERPs based on tailored content according to the colour of the product so you could most definitely try and this trick with either on all the colours of one or two products or on a handful of popular colours for one product.
Crawling and Indexing
After observing a few Shopify stores, we’ve found some SEO items that are unique to Shopify when it comes to crawling and indexing:
Robot.txt file
The robots.txt file, also known as the robots exclusion protocol or standard, is a text file that tells web robots (most often search engines) which pages on your site to crawl and which ones to not to crawl.
A very important bit of information- you cannot edit the robots.txt file.
While you can add the “noindex” to pages through the theme.liquid, this is not as helpful if you want to prevent Google from crawling your content altogether.

Photo Credit: moz.com
The following list shows the sections of a site that Shopify disallows crawling in:
- Admin area
- Checkout
- Orders
- Shopping cart
- Internal search
- Policies page
While it might be great that Shopify creates default disallow commands for you, its biggest limitation has be not allowing users to adjust the robots.txt file, especially when robots.txt is the easiest way to control Google’s crawl of your site as it’s extremely easy to update and allows for a lot of flexibility.
In response to this, we recommend using other methods of adjusting Google’s crawlers such as “nofollow” (The nofollow tag is a way publishers can tell search engines not to count some of their links to other pages as “votes” in favour of that content) or canonical tags.
The “noindex” tag
Just to reiterate, the nofollow tag is a value that can be assigned to the rel attribute (which defines the relationship between a linked resource and the current document) of an HTML an element to instruct some search engines that the hyperlink should not influence the ranking of the link’s target in the search engine’s index.
As we mentioned above, Shopify doesn’t allow you to edit or modify the robots.txt file, but does allow you to add the “noindex” tag, and here is how you do it:
Step 1
From your Shopify admin, go to Online Store > Themes.
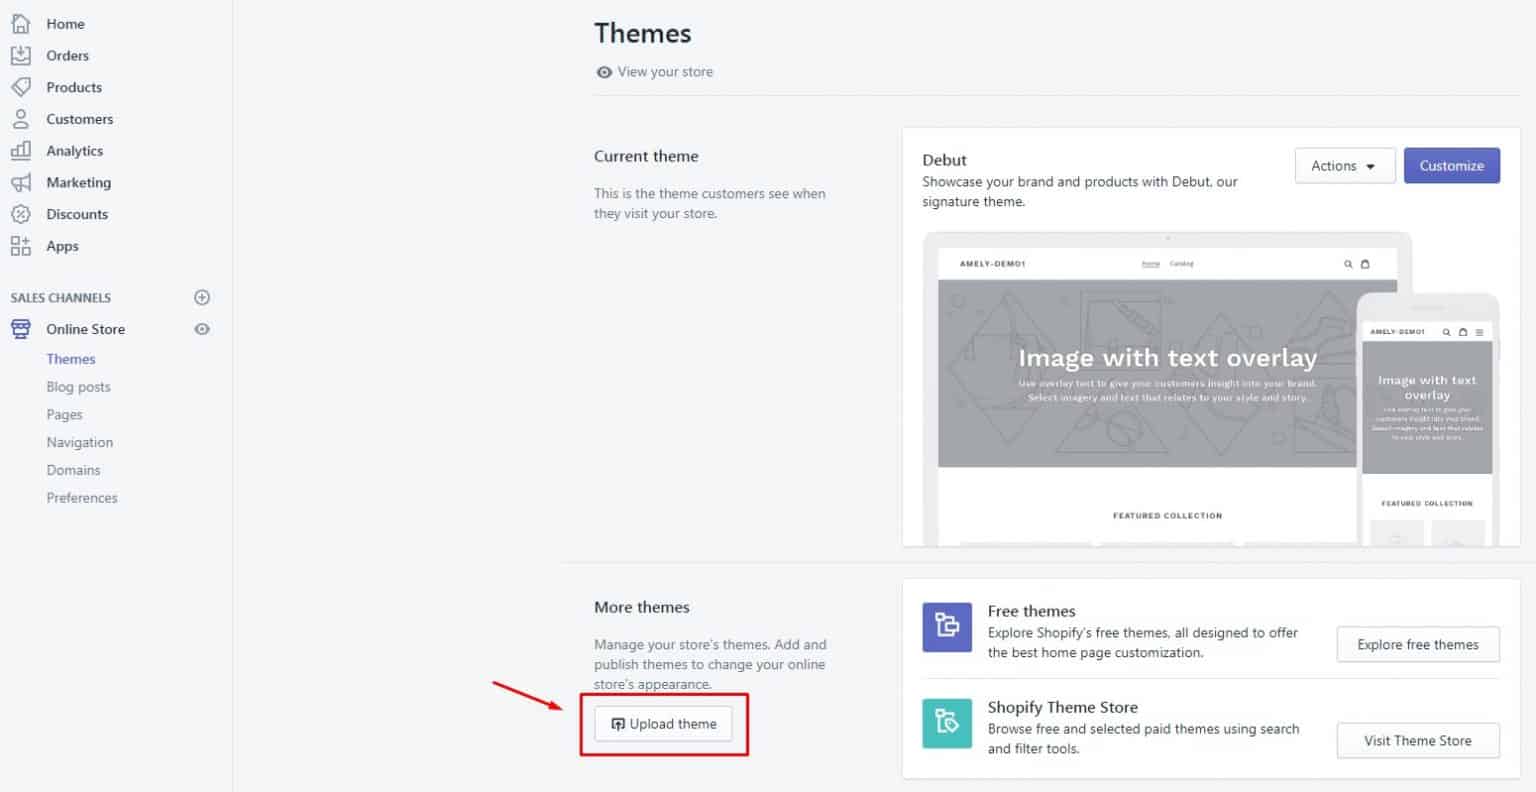
Photo Credit: themes.magesolution.com
Step 2
Find the theme you want to edit, and then click Actions > Edit code.
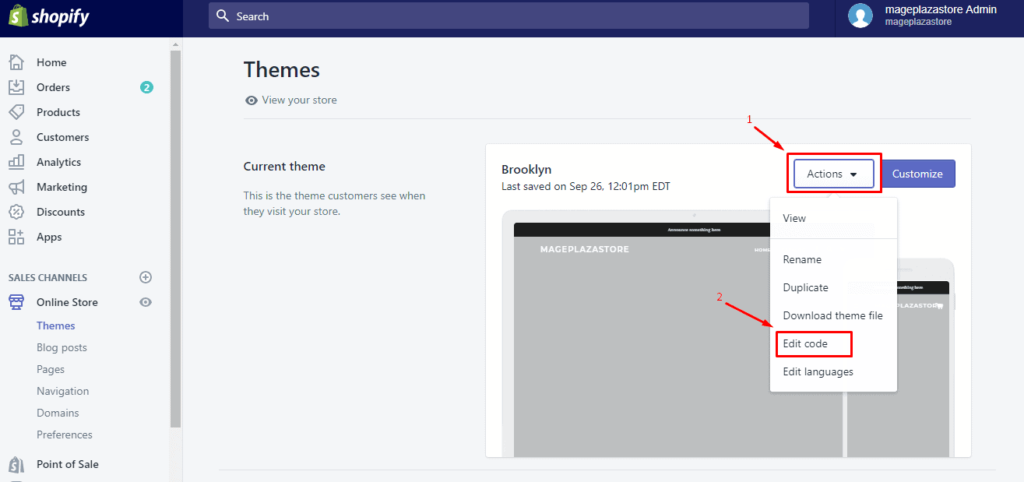
Photo Credit: medium.com
Step 3
Click the theme.liquid layout file.

Photo Credit: quora.com
Step 4
a) To exclude the search template, paste the following code in the <head> section:
{% if template contains ‘search’ %}
<meta name=”robots” content=”noindex”>
{% endif %}
b) To exclude a specific page, paste the following code in the <head> section:
{% if handle contains ‘page-handle-you-want-to-exclude’ %}
<meta name=”robots” content=”noindex”>
{% endif %}
Make sure that you replace page-handle-you-want-to-exclude with the correct page handle.
Step 5
Click Save.
Redirects
Redirects or URL redirection, or URL forwarding, is a World Wide Web technique for making a web page available under more than one URL address. Redirects are really helpful for consolidating old/expired pages or any other content that no longer exists.
Follow the steps below to create your own URL redirects:
Step 1
From your Shopify admin, go to Online Store > Navigation.
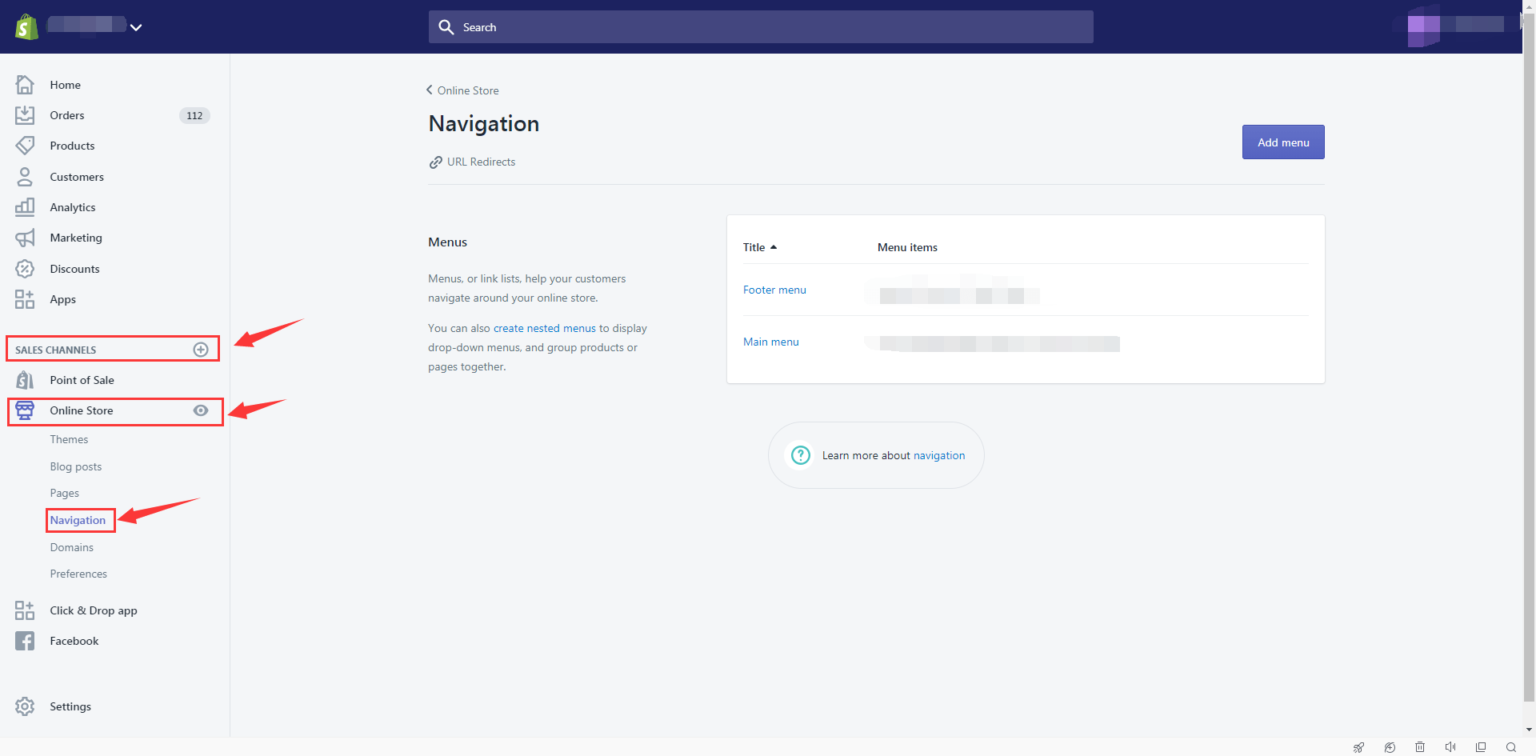
Photo Credit: docs.parcelpanel.com
Step 2
Click URL Redirects.
Step 3
Add URL Redirects.

Photo Credit: launchtip.com
Step 4
In Redirect from, enter the old URL you want to redirect visitors from. Only broken URLs should be redirected. If the old URL still loads a webpage, the URL redirect won’t work.
It is also important to note that URLs that begin with the following prefixes: /apps, /application, /cart, /carts, /orders, /shop, or /services cannot be redirected.

In Redirect to, enter the new URL that you want to redirect visitors to. If you want to redirect to your store’s home page, then enter /.
Note that the new URL can be either a relative URL (for example, /collection/shirts) or a full URL (for example, . To redirect traffic within your primary domain, use a relative URL. To redirect outside your primary domain, use a full URL.
Step 5
Click Add.

Photo Credit: flanneljesus.github.io
So far, adding global redirects (which searches for an alias of the current URL and does a 301 redirect to it if found. This prevents content from being displayed on multiple URLs when the path module is enabled) via Shopify hasn’t been possible, which means that your redirects will likely need to be 1:1.
Structured Data
Structured data markup (or schema.org markup) consists of data types and properties arranged in hierarchical order. In Shopify, it is recommended that you add structured data to your homepage, product pages, collection pages, blog page, and article pages.
Product Structured Data
In general, Shopify does a great job with structured data since it provides multiple themes that contain “Product” markup out-of-the-box which provides Google with essential information about your product such as name, description, price, etc.
Article Structured Data
The Article Structured data comes in handy if you’re an active user of Shopify’s blog functionality. This schema type lets Google know that your blog content is more editorial in nature.
Moreover, a recent trend has been observed where Google seems to pull content with Article structured data into platforms such as Google Discover and the “Interesting Finds” sections in the SERPs.
Therefore, ensuring that your blogs contain this “Article” schema will definitely increase the chances of your site’s content showing up under these sections.
BreadcrumbList Structured Data
In the story of Hansel and Gretel fairy tale, the two title children drop breadcrumbs to form a trail back to their home. This anecdote from the fairytale has inspired the current age concept of a “breadcrumb”.
A “breadcrumb” (or “breadcrumb trail”) is a type of secondary navigation scheme that reveals the user’s location in a website or Web application.
For this very navigation purpose, breadcrumbs are highly recommended to provide users with easy-to-use internal links that indicate where they’re at within the hierarchy of a website.
More importantly, it allows search engines such as Google to understand the structure of your website better. Marking up your site breadcrumbs to your Shopify site with BreadcrumbList structured data would be our recommendation!
Keyword Optimisation
Similar to Yoast SEO, Shopify too allows you to optimize certain key elements of your such as your title tags, meta descriptions, and URLs, and to adjust these elements on your Shopify site, simply navigate to the page you wish to adjust and scroll down to “Search Engine Listing Preview”:

Photo Credit: moz.com
Register your Shopify store with Google Search Console and Bing Webmaster Tools
Registering your Shopify site with Google Search Console and Bing Webmaster Tools – the two most popular search engines, would put your website on the map and make sure it gets crawled.
Note that you should register both the www and non-www version of your domain (i.e., www.yourdomain.com and yourdomain.com), and, if you’ve got a secure and non-secure version of your website, the http:// and https:// versions of each.
To Register with Google Search Console
The way to go about registering is by “adding your website property” to your Search Console account:
Step 1
Open the property selector dropdown in any Search Console page.
Step 2
Select + Add property on the dropdown.

Photo Credit: wordstream.com
Step 3
Choose the type of property to add:
- URL-prefix property
- Domain property
- Google-hosted proper
Step 4
After choosing the property type, you will be given a selection of verification methods to verify your site ownership. It is only after the verification can you access Google Search data, and can affect your website’s presence on Google Search. Every Search Console property requires at least one verified owner.
Below is a list of verification methods available for all types of website properties

Photo Credit: moz.com
Google periodically checks if your verification is valid (for example, checking if your HTML verification tag is still present). If verification can no longer be confirmed, your permissions on that property will expire after a certain grace period.
Step 5
Data collection for a property starts as soon anyone adds the property in any Search Console account, even before verification and continues as long as any user has that property in their account, whether or not it has a verified owner.
If your property has no data several days after verification, it is possibly because the site hasn’t been seen in Google Search, or that you have specified the wrong URL (for example, you specified HTTP instead of HTTPS for your URL-prefix property).
To Register with Bing Webmaster Tools
Step 1
Create a free account with Bing Webmaster Tools by signing up to the Bing Webmaster Tools sign-up page.
The sign-up can be done through your Microsoft, Google or Facebook account.
Step 2
Adding your website and verifying it is the next step.
Once you have a Bing Webmaster Tools account, you can add sites to your account. You can do so by entering the URL of your site into the Add a Site input box and clicking Add.
The verification process is ta little different to the Google Search Console process since there are three ownership verification methods. Click the option you think is best suited for your site and follow the proceeding instructions:
- Option 1: XML file authentication:
Click BingSiteAuth.xml to save the XML file to your computer. This file contains your personal verification code. Next, upload the file to the root folder of the site you are trying to add.

Photo Credit: bing.com
- Option 2: Meta tag authentication:
Copy the displayed <meta> tag with your personal verification code to the clipboard. Then open your registered site’s default page (the home page) in your web development environment editor and paste the provided code at the end of the <head> section. Lastly, save and upload the revised default page containing the new <meta> tag to your site.
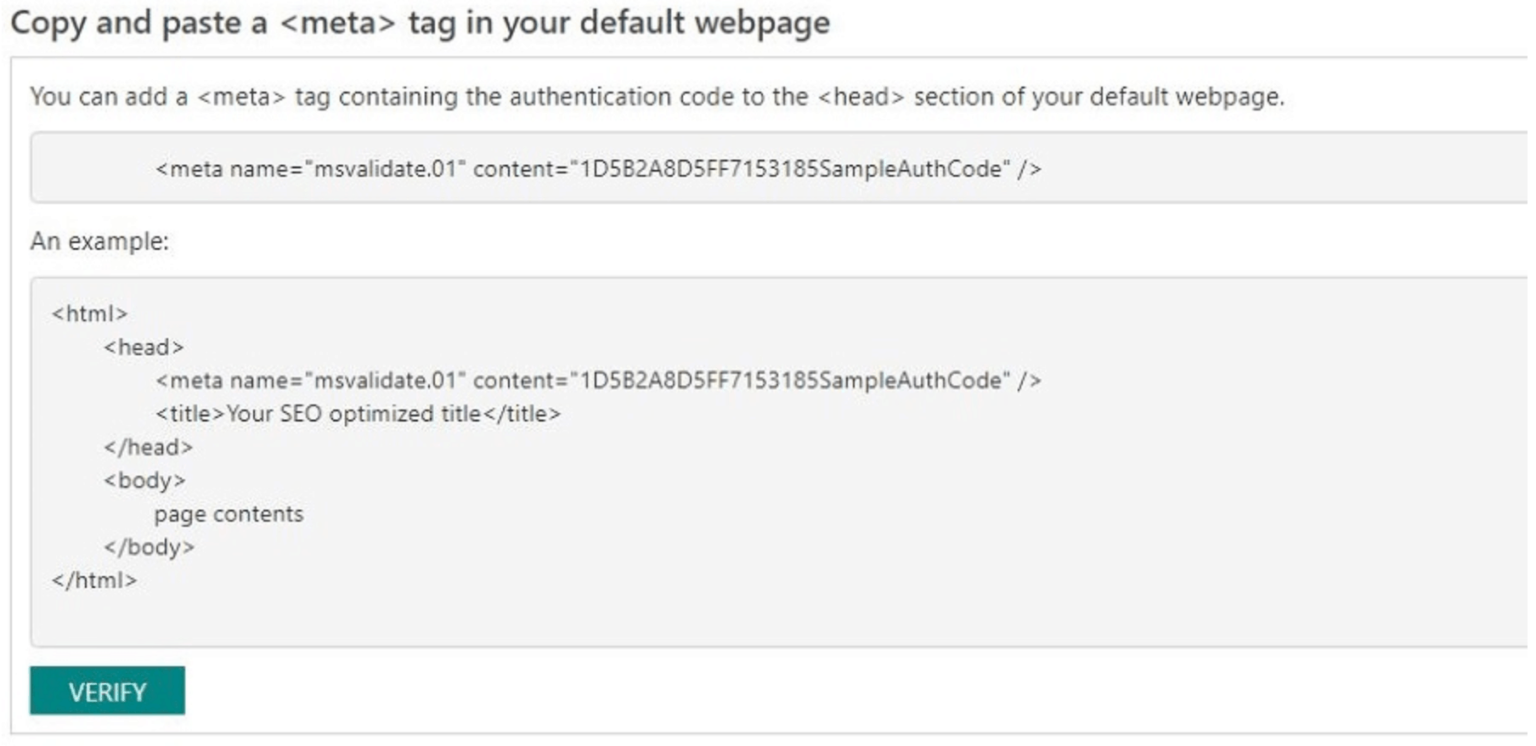
Photo Credit: bing.com
- Option 3: Add a CNAME record to DNS:
This option requires access to your domain hosting account. Inside that account, edit the CNAME record to hold the provided verification code (a series of numbers and letters) we have provided you. When done ensure the information is saved.

Photo Credit: bing.com
Finally, click on verify. You should expect a green checkmark at the top and a message saying that your domain is verified. In the absence of, which a red cross mark should appear in which case, Bing Webmaster Tools was unable to verify your website, and it’s recommended that you look at the error message to check with an issue with site verification.
Step 3
Creating and uploading your sitemap is a great way to inform Bing about URLs on your site, and is the next step after the verification process.
Fortunately, Bing supports different formats:
- XML Sitemaps and XML Sitemap index files (as specified by www.sitemaps.org)
- Atom 0.3 and 0.1
- RSS 2.0, and
- Text files (containing one URL per line)
On your main Dashboard page, you find a section showcasing Sitemap-related information. Just below this Sitemaps widget, click Submit a Sitemap, enter the URL of your sitemap in the input box, and click Submit.

Photo Credit: bing.com
The sitemap typically lives at the root of your domain, so if your domain is www.abc.com, its location would be something like http://www.abc.com/sitemap.xml.
Step 4
Finally, and most importantly, is the SEO planning strategy which can be easily done using Bing Webmaster Tools.
Inside Webmaster Tools, you will see two areas that will help you with this task: One can be found under Reports & Data and is called SEO Reports. The second can be found under Diagnostics & Tools and is called SEO Analyzer.
SEO Reports will run automatically on any domain you have verified in your account, so roughly twice a month you’ll see fresh reports with suggestions about which items you should address for SEO. If your domain has been verified only recently, you may need to wait a few days before seeing these reports.
In contrast, SEO Analyzer is an on-demand tool which will scan a single page on-the-fly and prepares an SEO report for you within seconds. You can use this tool immediately and as often as you like for all pages on your site.
Non-technical SEO Recommendations
Moving on the non-technical SEO tips, do note that these tips are more general recommendations which would allow you to rank better in the SERPs. Even though these recommendations can be easily employed without much coding knowledge, we encourage you to research the following topics more so that you can take it a step further.
Logical Site Structure
Below is an example of an e-commerce site structure.

Photo Credit: ahrefs.com
As you may notice, the diagram exhibits a strict hierarchy which allows users to navigate your content more easily, as well as allows crawlers to index your site with ease. This easy and crucial step towards organising your site will definitely get you closer towards ranking higher within the SERPs.
But how do you organise your content on Shopify?
Step 1
As you may already know, in Shopify, category pages are known as “collections,” and product pages are known as “products.”
To create a collection page, go to Products > Collections, then click “Create collection”.

Photo Credit: avada.io
Step 2
To create a product page, go to Products > All Products, then click “Add product.”

Photo Credit: ahrefs.com
Step 3
While you’re creating the product page, make sure you add it to a collection.
You can also use automated collections to add products to collections automatically, which is highly useful if you have lots of products.
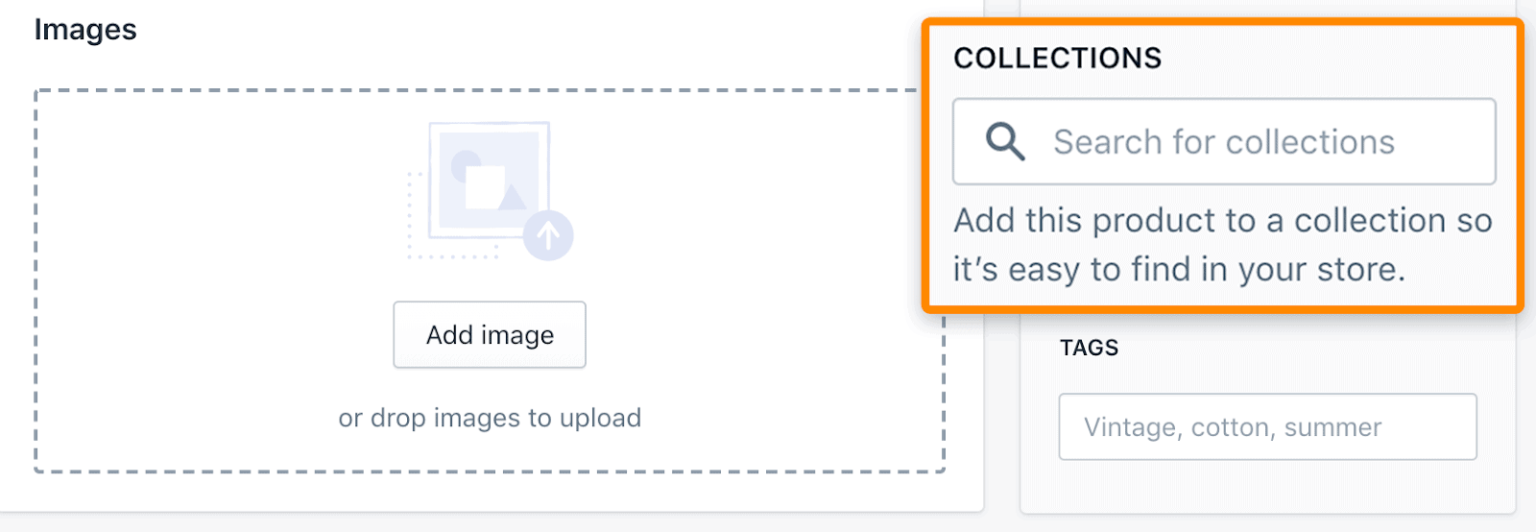
Photo Credit: ahrefs.com
Step 4
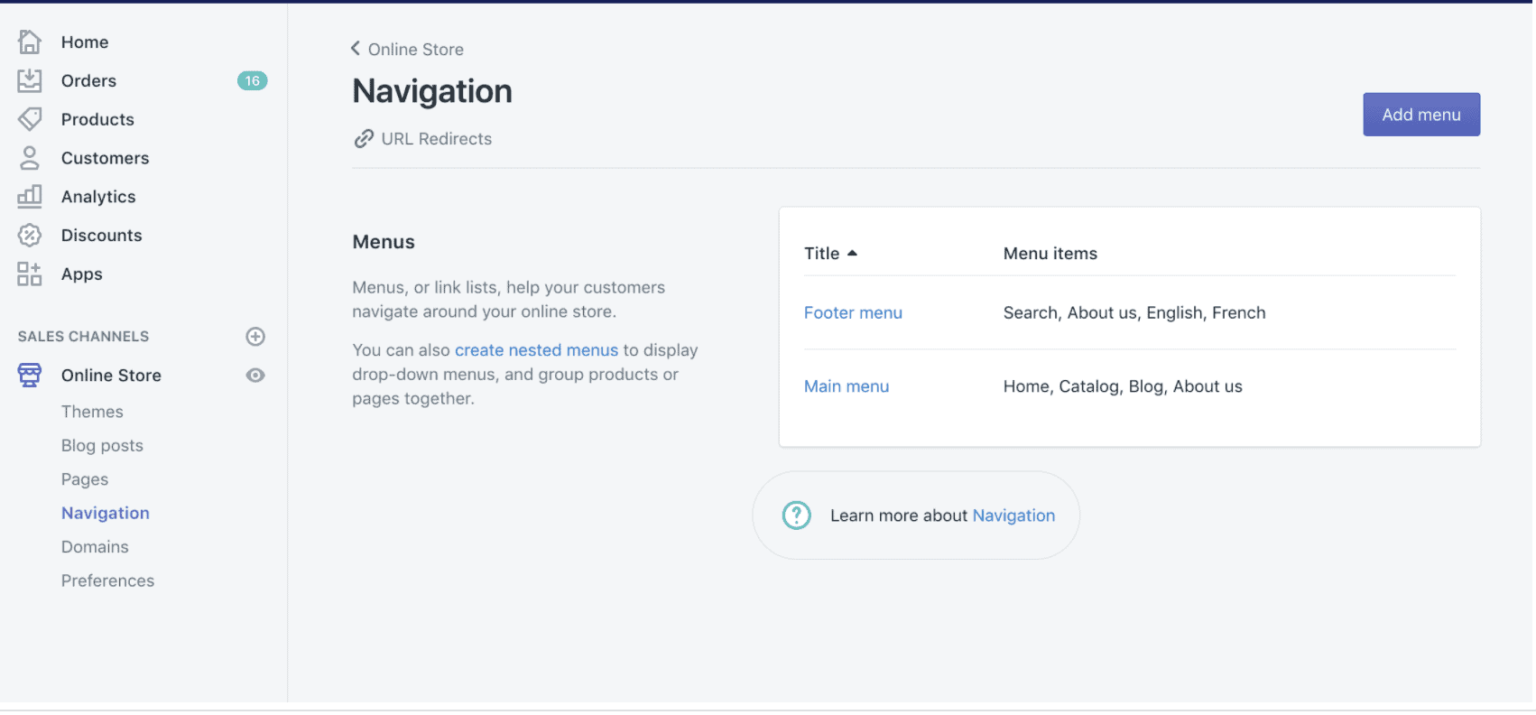
Finally, go to Online store > Navigation to add these collections to your main menu.
An important note here is to know that Shopify does not differentiate between categories and sub-categories.
If you want to create a sub-category page, you’ll have to create “collection” pages and nest them within a hierarchy in the menu.
Here is how you can do it:
Adding categories and subcategories
While you set up your main menu under Shopify Admin > Online Store > Navigation, you can “nest” the collections that you consider the subcategories under the main category. This will cause a drop-down effect to happen on the main menu.
Nesting menu items to build drop-down menus
You can build drop-down menus by creating or moving menu items so that they are “nested” below a top-level item. The top-level item appears in the main menu on your online store, and the nested menu items appear as a drop-down menu. The top-level item can have up to two levels of nested drop-down menus:

Photo credit: help.shopify.com
Note that some Shopify themes will display nested items as drop-down menus from the main menu, while other themes will display nested items as drop-down menus in other locations or display an icon beside the name of a drop-down menu in the main menu to help customers recognize that a drop-down menu is there.
Add a drop-down menu from the main menu
Step 1
From your Shopify admin, go to Online Store > Navigation and click on the title of your main menu.
Step 2
Choose one of the menu items to be the header for your drop-down menu, or add a new menu item to be the header. If you don’t want the header to link to anything, then you can enter in the Link field when you add the menu item.

Photo Credit: themeskills.com
Step 3
Add menu items to include in the new drop-down menu. Click Add menu item, enter the name of the menu item and enter or select a destination for the link.
Click and drag the menu items to nest below the header item:
To understand the process better, you can refer to the following YouTube videos:
- How to create a drop-down menu
- Understanding drop-down menus
- Add a Manual Collection
- Add an Automated Collection
Step 4
Click Save.
Keyword Research
Keywords are two to five-word phrases that your potential clients would type into a search engine when looking for you (or a business like yours.)
The primary way to do this is to search on Google for a word or phrase that describes your page. If the top-ranking pages are similar to yours, look at their title tags to try to deduce the keywords they’re targeting.
The next bit of keyword research involves using short or long-tailed keywords.
The drawback of using short keywords is that you tend to compete with a large threshold of billions of results. For example, if you are an online e-commerce company selling headphones, you would want your searchers to type in “best headphones”.

Photo credit: OnCrawl.com
However, adding such small keywords would generate millions of results and is very likely to rank your competitors higher who have been in the industry much longer.
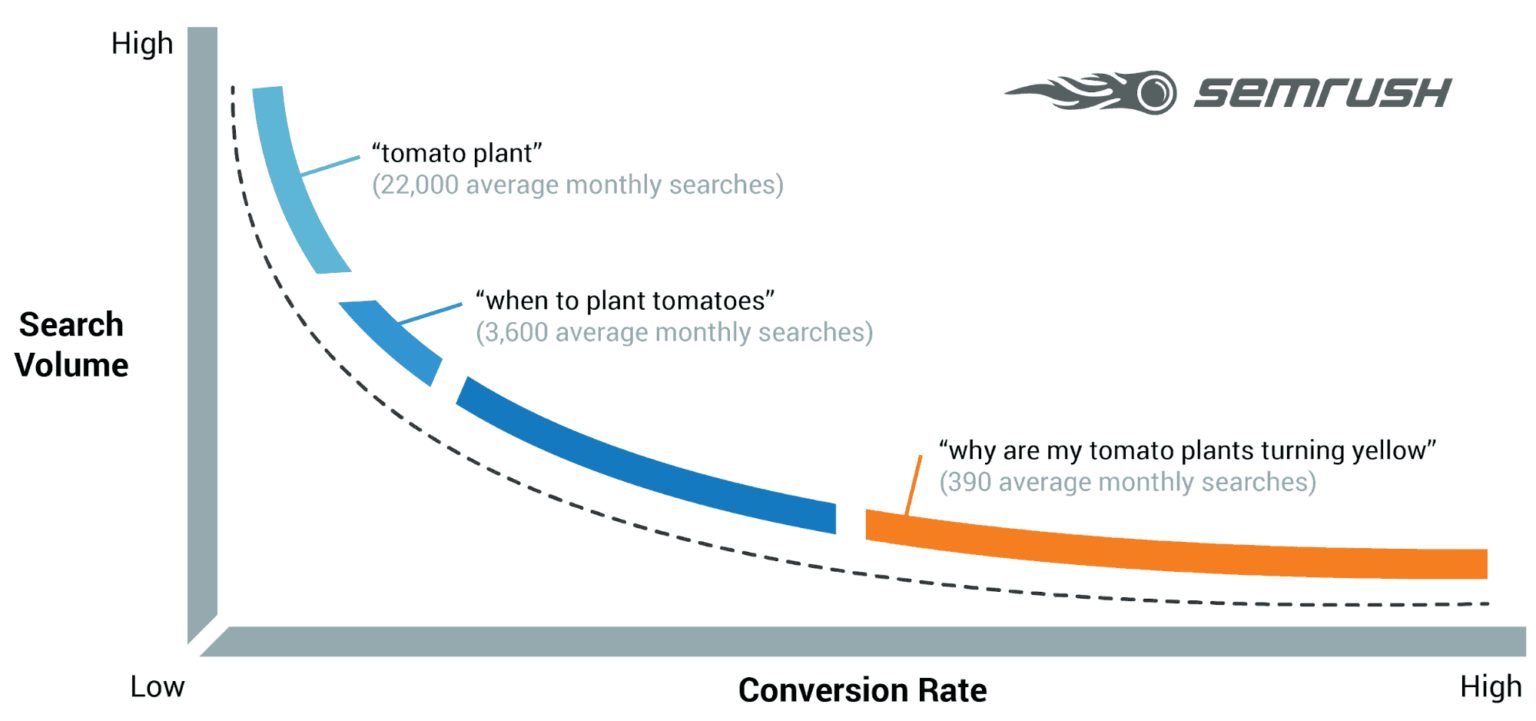
Photo Credit: semrush.com
This is why using longer keywords help as it allows your business to boil down to certain key features such as “best headphones in London” or “best headphones under £15”.
The more targeted your keyword, the better as you’ll be able to attract the right audience and increase the chances of searchers clicking on your website from search results.
At Pearl Lemon, we have carefully selected the most effective ways to help you find the keywords for your website:
One of the best ways to rank high is to make sure you find the right keywords for your business and to use these words in the text and other elements of your website.
Make a List
The first step to a Keyword hunt is to maintain an organized list of all your findings. Try and think of possible keywords your visitors’ may type, or even google the most used phrases so that you can refrain from using them, to avoid getting lost in the crowd. As always, remember to stand out!

Photo Credit: searchenginejournal.com
Be Specific
While brainstorming, make sure you choose words that resonate with you, your business and the product or service it offers. Then, add your edge to it by making it trendy by means of using words like DYI.
If you run a local business, try adding a word that describes your location. This will help you target customers in your area and help the right people find your site.
Put yourself in your Customers’ Shoes
Play around with your perspective; instead of focusing on how your business should be presented, think about how you would like for it to be found.
Think about what your potential client would be looking for as they Google away on their computer or phone. For example, if you describe yourself as a “painter”, your target audience may be looking up the term “artist” more often on search engines.
Embrace Technology
As much as organically thinking of effective keywords may help, using tools such as Google Analytics, Moz Explorer, or SEMRush may come in handy in your keyword hunt.

Photo Credit: PageUp.com
These tools tell you exactly how many people are searching for specific terms each month. They also suggest terms to use and can tell you if a keyword is very competitive.
Google Keyword Tool
Apart from being a free SEO tool, Google Keyword Tool is owned by – Google. The only condition for using the tool is to run an AdWords campaign on Google. If you do want to set up an AdWords campaign, however, you can then use the Keyword Tool to access monthly search numbers for a specific term nationwide, in your state, or even in your city.
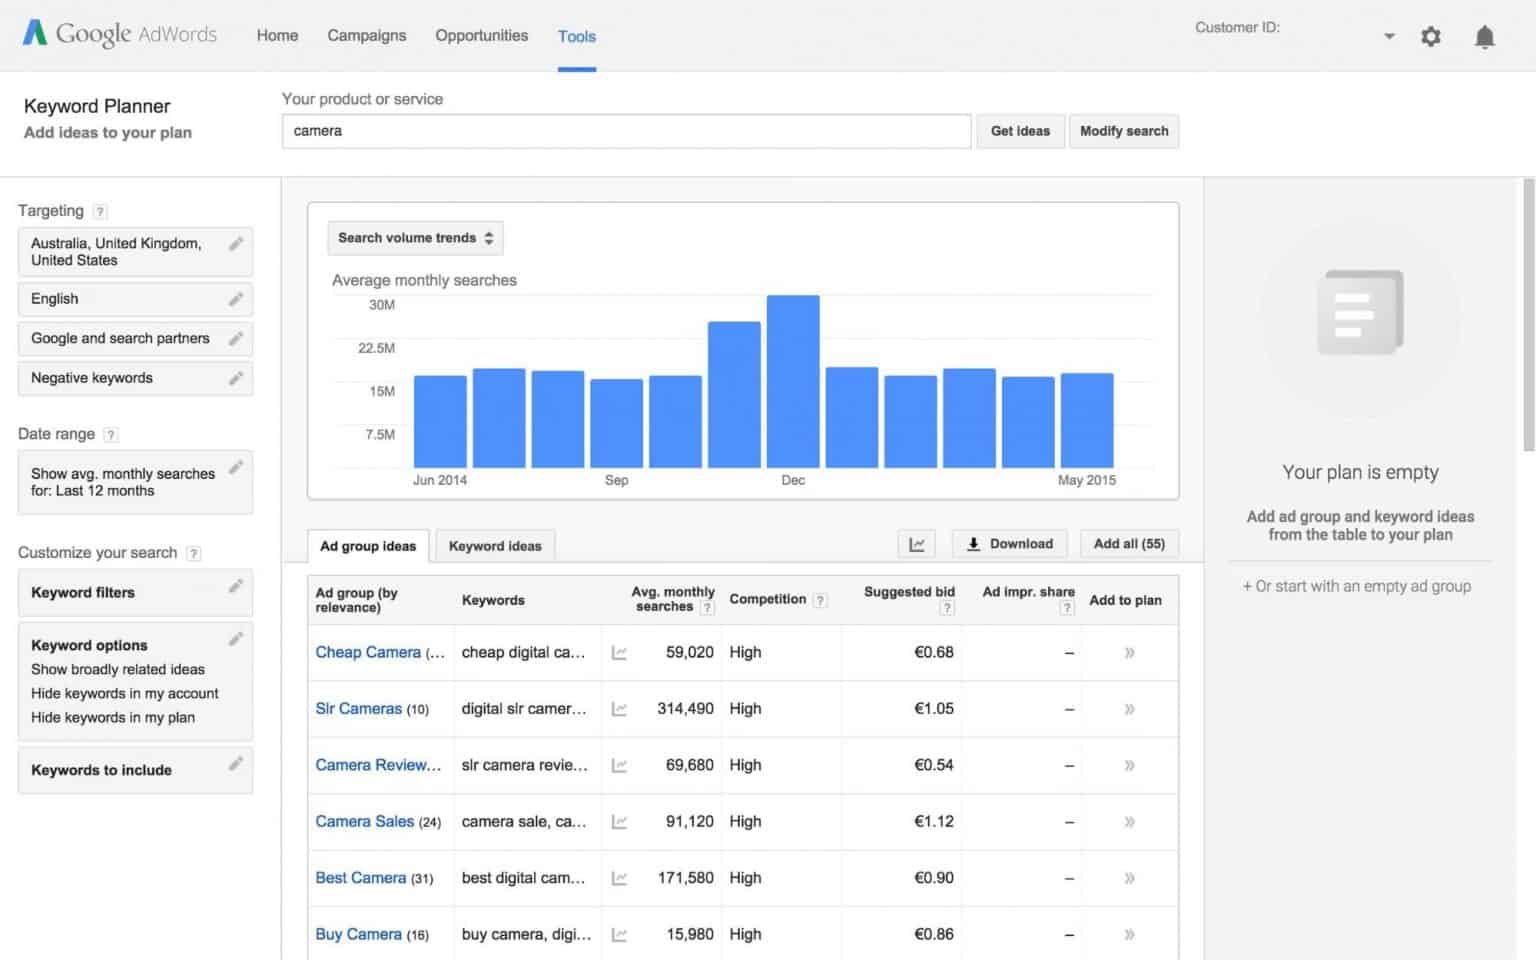
Photo Credit: SirenSearch.com
Moz Explorer
While the Moz keyword tool only provides nationwide search data, it is excellent at recommending phrases that you may not have thought of. Its ability to suggest longer tail (more than 3-4 words) keywords with lower search volumes make it a great choice for small businesses.

Photo Credit: HookAgency.com
Moz charges a monthly fee, but you can try it out free for 30 days. (And that should be more than enough time to get all the data you need.)
SEMrush
In addition to getting keyword data, you can also use it to find out how your competitors are ranking. (Just enter their Domain, click on Organic Results and click on Positions) SEMRush only gives you one day to try out their tool and then you’ll have to pay.

Photo Credit: SeerInteractive.com
Study your Competitors
While you may be an excellent baker based in the heart of New York City, phrases like “best NY baker”, or “the best New York bakery” are not likely to help you a lot in your ranking on the SERPs. These are highly competitive terms, and it will be virtually impossible for a start-up bakery to show up on the first page of Google.
Find a niche instead – Look for your niche and try to find keywords that represent it.
Are you particularly talented when it comes to wedding cakes or small cupcakes? Or do you specialize in a certain type of cookie whose recipe was handed down to you through generations? Add some specific adjectives to your key phrases, and you’ll boost your chances of ranking high.
Always choose Quality over Quantity
Choosing keywords that are highly competitive makes your SEO process very cumbersome. Instead, look for quality keywords that accurately and specifically describe what you do.
Use SSL
SSL stands for Secure Sockets Layer and, in short, it’s the standard technology for keeping an internet connection secure and safeguarding any sensitive data that is being sent between two systems, preventing criminals from reading and modifying any information transferred, including potential personal details.
Internet browsers tend to dislike non-secure websites or website that do not use the SSL certification and display warning messages to people visiting them, eroding visitors’ trust in affected sites. This can seriously harm your outreach as people might perceive your website to be affected with malware.
To save your customers and website reputation, you need to have an SSL certificate from reputed SSL providers like comodo SSL certificate, rapidssl certificate & GlobalSign SSL certificate. These are providers that offer the lowest priced SSL cert. You can get any SSL type that your website may fit with.
It is important to ensure the SSL option is activated by going to your Shopify dashboard and then to Sales Channels > Online Store > Domains.
Unique Titles and Descriptions
SEO crash course 101 dictates that you manipulate the meta descriptions to your advantage through thorough optimization.
This is important because when Google notices the same metadata across websites, it may seem like your website contains duplicate content. This is ‘frowned upon’ by search engines, as they won’t know how to rank your pages.
Therefore, adding unique keywords in titles and descriptions adds an edge to your meta description and is smoothly indexed by crawlers, no questions asked.
Equally important is to write titles and descriptions that are catchy and attractive so that the Internet people will choose your website, rather than another result.
In Shopify, editing to optimize title tags, meta descriptions, and URLs of your product and category pages can be done by:
Choose one of your collection or product pages, scroll down, and you’ll see “Search engine listing preview.” Click “Edit website SEO” to edit the metadata.

Photo Credit: hrefs.com

Photo Credit: ahrefs.com
Fill in the title tag and meta description as you please but do remember to make it unique for each title, include your target keyword, brief, descriptive and more importantly to avoid truncation – follow the character recommendation in Shopify.
Fast Site Load
In 2010, Google announced that a website’s loading time would be considered as a ranking factor. Before you begin, make sure to check your current website load time using Google’s PageSpeed Insights or GTMetrix, to know where your website currently stands and how much you need to work on its improvement.
Unfortunately, Shopify’s options for improving page load speed are relatively limited, but you can definitely consider the following:
Theme Selection
Few themes on Shopify are faster compared to others, but if you are restricting yourself to themes that are available on Shopify Theme Store, you should be okay.
Image Compression
Use apps like Crush.pics to compress your images before uploading them to Shopify as they dramatically decrease your website load time.
App Installation
The majority of apps downloaded via the Shopify App Store cap your store’s responsiveness. And hinder your site’s performance.
Adding Alt Text
As visually impactful images make your website content, it is equally important to caption them or add an alt text to your images for context to enhance the user experience. Search engines tend to perceive websites with optimized images as more polished and grant them with a better overall ranking.
More importantly, captions are important since Google cannot read or recognize images as we do.
Hence, complimenting images with captions helps Google to understand what’s on your photos, graphs, and other pictures and ultimately drive more traffic to your site.
Here is how you add Alt text on Shopify:
Upload an image > Click “…” > Click “Edit alt text”

Photo Credit: avada.io

Photo Credit: uplinkly.com
Start Blogging
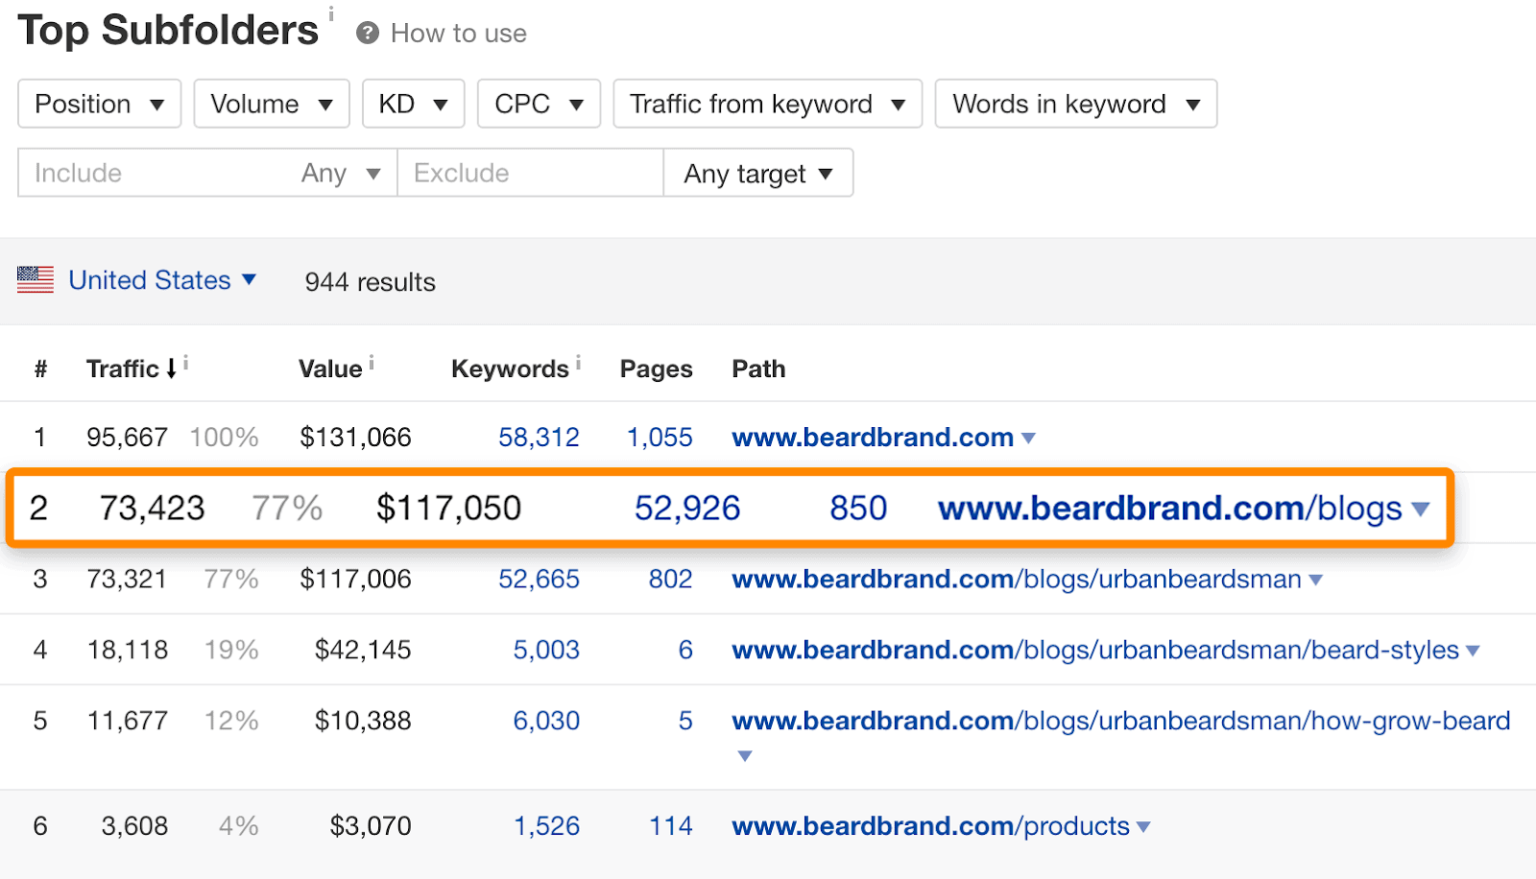
Beardbrand, which is a men’s grooming company, has successfully generated 136,000 search visits per month, out of which 77% of their total estimated search traffic comes from their blog accounts.
Other than the immense traffic blogs bring to your page; there are many other reasons why you should complement your website with them:
- Since acquiring links to product or category pages is cumbersome, it’s much easier to get links to informational content which can be strategically used to add your internal linking structure and transfer that “authority” to the pages that matter.
- Creating educational blogs about your products, the journey or vision behind it makes is a personal experience for your readers and make them feel like they’re a part of a community. Moreover, pointing out the different stages of the buyer’s journey will surely increase the chances of them buying from you in the future.
Your Shopify store includes a blog named “News.” You can choose to keep this blog or create a new blog, just refer to the following steps:
Step 1
From your Shopify admin, go to Online Store > Blog Posts
Step 2
Click Manage blogs.
Step 3
Click Add Blog.
Step 4
Give your blog a title, and then select how you want to manage comments and select Save blog!
Tip: You can also choose a theme for all your blogs! Simply, click on the Template drop-down menu, select the template that you want.
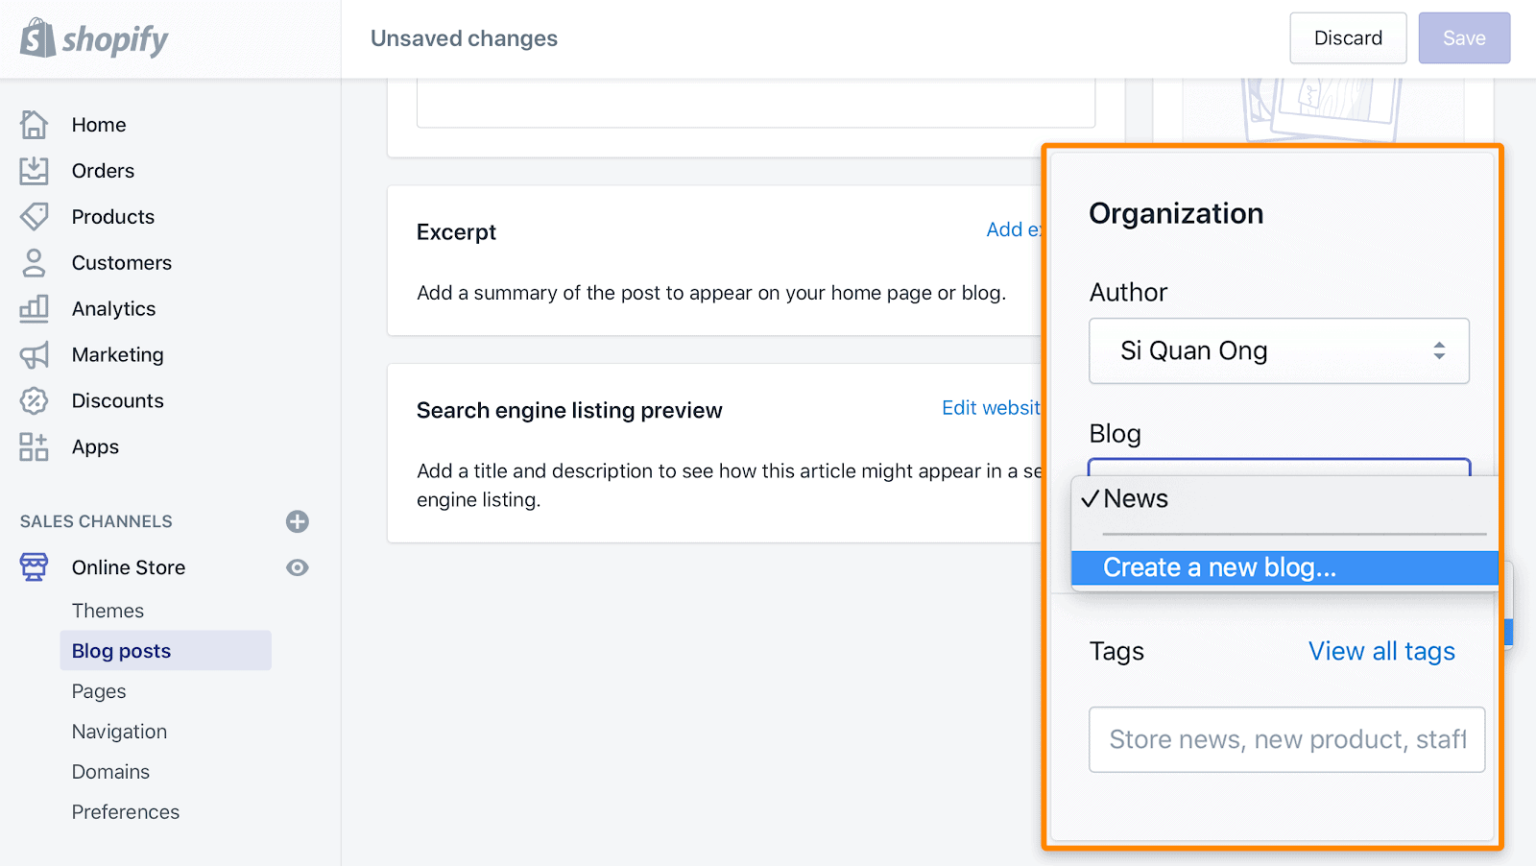
Photo Credit: ahrefs.com
Edit the search engine listing for a blog
You can also edit the text that appears in search engines for blogs by using descriptive titles and informative yet brief descriptions.
To do this:
Step 1
From your Shopify admin, go to Online Store > Blog Posts.

Photo Credit: avada.io
Step 2
Click Manage blogs and click on the name of the blog to edit.

Step 3
In the Search engine listing preview section, click Edit website SEO.
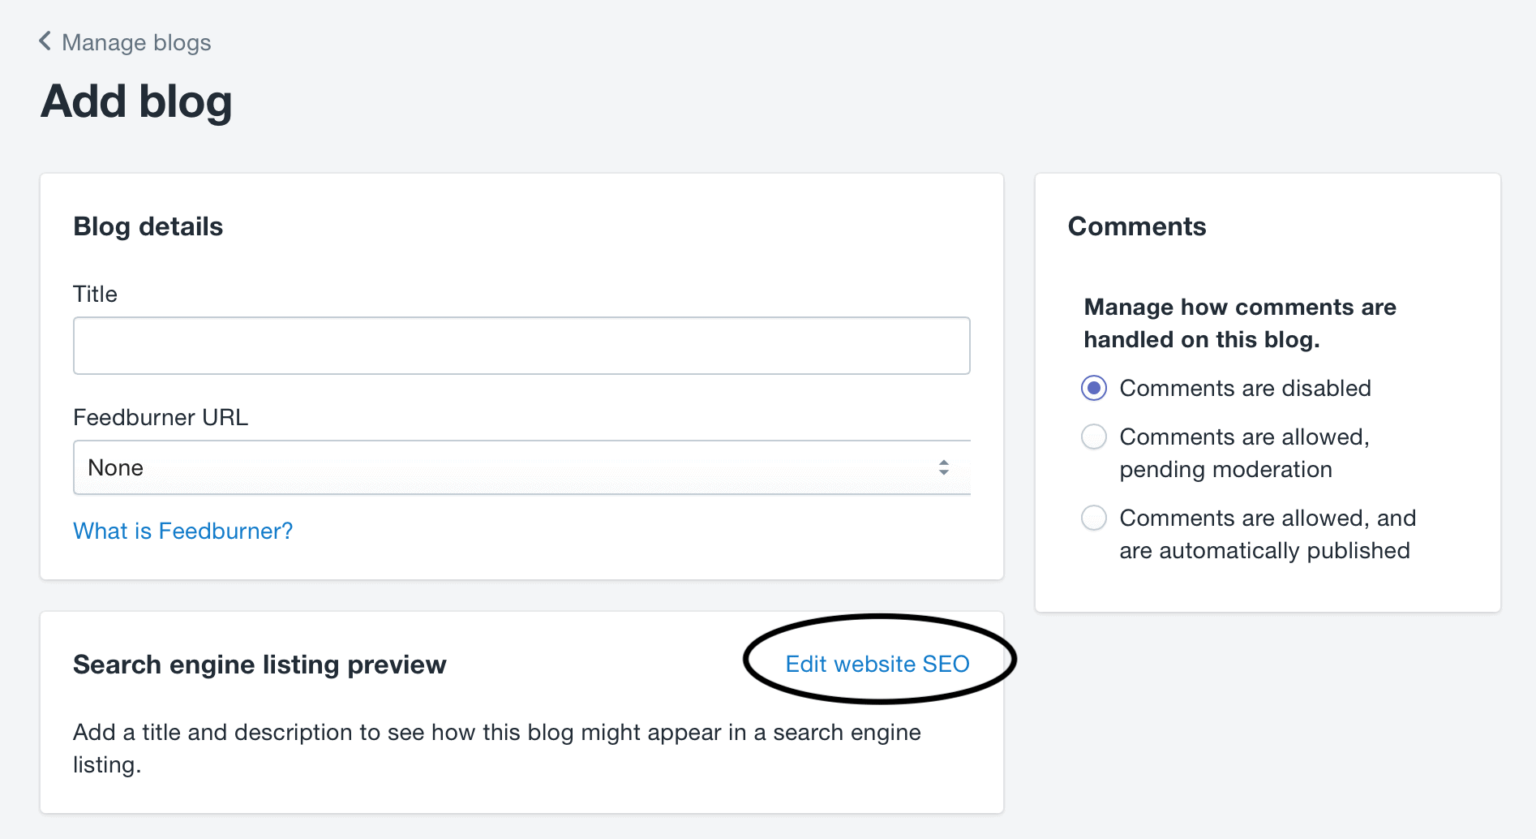
In the Page title field, enter a descriptive title. This title will display as a link in search engine results. You can enter up to 55 characters in the title.
Enter a description for the search engine listing. Make sure to include relevant keywords to help new customers find your link, and to include your business name. You can enter up to 320 characters in the description.

Photo Credit: thehoth.com
External Blog Linking
You can also add a link in your online store navigation to a blog hosted on a third-party platform such as WordPress, Tumblr, and Blogger. The link will appear in your main navigation or within a menu, depending on what you choose.
Step 1
From your Shopify admin, go to Online Store > Navigation.
Step 2
Click the name of the menu where you want to add the link.
Step 3
Click Add menu item, or choose an existing menu item to edit.
Step 4
Enter the link name, for example, “Home page”, into the Name field.

Photo Credit: avada.io
Step 5
Paste the link to your blog in the Link field and click on Save Menu.
Adding Content to Product Pages
Ideally, if you want each product page to be indexed its recommended that you add unique content to each page. A common issue across Shopify stores is that your Shopify products may not have unique on-page content associated with them. This occurs due to the use of the same descriptions across multiple products or lack thereof.
As previously discussed, it surely would be very time-consuming to write unique content for every product on your e-commerce website, and this is where Shopify’s Sales report feature comes in.
To sum it up, the sales report provides you with information about your customers’ orders based on criteria such as sales over time, by product, or by channel. This crucial information can be strategically used by adopting a targeting approach where you develop unique content for products on your site that are popular amongst your consumers.
You can find this report in Analytics > Dashboard > Top Products By Units Sold.
This approach identifies the high priority pages and products, allowing you to optimise your page and making the copywriting process worthwhile.
SEO Apps
In the wake of rampant digitalisation across all sectors of the economy, don’t step back when it comes to using these applications as SEO best practices.
Our Shopify SEO experts here at Shopify have outlined the best apps that will greatly complement the e-commerce website optimisation process:
Crush.pics
Crush.pics is a great automated way of compressing large image files. Crucial for most Shopify sites as many of these sites are heavily image-based.
JSON-LD for SEO
JSON-LD for SEO is the safest, easiest, and most effective way to get Rich Results for your Shopify store.
Trusted by thousands of stores and in constant development since 2015, it’s been updated, maintained, and tested to ensure that you get the best structured data for your store to get the results you need in Google, Bing, Pinterest, and other search engines.
Smart SEO
The Smart SEO app automatically adds product meta tags (meta title and meta description) and alt tags for every product in your store.
With its new feature of multi-language support for meta tags (meta titles and meta descriptions) and JSON-LD structured data, running your store in multiple languages is no longer a complication.
Yotpo Reviews
Yotpo, an official Shopify Plus Technology Partner, has received more than 1,300 five-star reviews in the Shopify App Store and helped the fastest-growing Shopify stores increase sales with customer content.
The single-platform approach integrates data-driven solutions for reviews, loyalty, SMS marketing, and more, empowering brands to create smarter, higher-converting customer experiences.
App Limitation
Similar to WordPress plugins, Shopify too will add additional codes (such as JavaScript and CSS files) to your website each time you add a new application. This would lead to adverse effects on your website, such as slowing down your site load time.
This is why it is important to not go overboard with your the choice of apps on Shopify, especially when the apps (a majority of which are focused on improving conversions) have a reputation of being susceptible to bloats.
Dwell Time
‘Dwell time’ is a phrase used by SEO experts to refer to the length of time a user spends on a website before returning to search results.
Most SEO experts agree on the fact that higher the average dwell time of your visitors on your website, the better it performs on the SERPs since it indicates to search engines that it satisfies user queries.
Here are a few tips on how to keep your visitors hanging around your website:
Create genuinely great content
From writing engaging, in-depth blog posts to showcasing fantastic product images, give people a reason to stay around and engage with your content! The better the quality you produce, the more traffic you get.
Simple navigation
A simple navigation structure that makes it easy for users to get from one part of your website to another will greatly enhance user experience and ultimately work well for your SEO.
Internal linking
As mentioned before, internal linking can greatly enhance your SEO as it distributes the traffic across your website, giving the crawlers the chance to understand the authenticity of your page and indexing them efficiently.
You can add ‘see also’ resources or ‘suggested further reading’ call to actions to achieve this.
User Interaction
Encourage people who visit your website to leave comments on your blog posts (and to read them) and share them. Use conversational languages such as “Make sure to share with your friends”, etc.
Embed videos
Embedding videos on your pages would be very strategic since watching them will take your visitors a while before moving onto other elements on your page.
One thing that’s important to remember however is not to just put any old content or ‘fluff’ on a page to keep people there longer: whatever you place on it has to be of genuine value to a user.
Create Backlinks
A backlink for a given web resource is a link from some other website to that web resource. A web resource may be a website, web page, or web directory, and the best way to optimise your Shopify game is by creating backlinks to your website.
Increasing Traffic to your Blog
Ensuring backlinks and receiving heavy traffic on your blogs go hand in hand- the more traffic it receives, the easier it becomes to generate backlinks o your blog.
Blogs in themselves have the potential to dramatically increase the number of people visiting your site. According to inbound marketing experts Hubspot, businesses that blog regularly tend to attract 55% more traffic than those that don’t.
The Right Writer
You might believe that you’re the best-suited person to write your own blogs for your company, but most times, that isn’t the truth. You might have the passion and knowledge but lack the articulation of the same. In this case, make sure you find someone who can bridge this gap and provide great content for your readers.
The key characteristics you should be looking for in your writer should be a passion, knowledge of the subject your e-commerce website is about, and have the time to dedicate themselves to writing superb engaging content.
However, if you decide to continue writing posts for your business, make sure your personality comes across in your posts as this helps you form a rapport with your readers, who may be more inclined as a result to come back to your blog simply because they like you as the person you are.
Use Keyword Research
Keyword research can come very handy if you’re looking to write about blogs that are doing increasingly popular within your industry.
You can use a wide range of keyword research tools such as Semrush or Ahrefs to discover the number of monthly searches for particular keywords and make calculated decisions when it comes to choosing the right words that will help you rank but at the same time aren’t too competitive.

Photo Credit: stylefactoryproductions.com
Long-Form Content
Long-from content refers to posts with high word counts that go into huge depth on a particular topic.
Studies show that ‘long-form content’ performs better in search results than short or ‘thin’ posts, and there are a couple of reasons why:
Keyword-rich
Longer posts are usually very keyword-rich; in a 5000+ blog post with relevant keywords are more likely to crop up as results for ‘long tail’ keyword searches.
User Satisfaction
The in-depth nature of these blog posts are educational to the point where the readers develop a holistic idea about the topic you’re writing about which satisfies them: it will be more likely to answers your visitor’s query or solve their problem.
This causes your posts to get shared on social media or get linked to from other sites — with very positive implications for traffic.
Add Images
Not just any images- but high quality, eye-catching ones. Adding images acts as a buffer between lines and lines of data and information. The more pictures you add, the more visually appealing your blog looks- this is very likely to keep your visitors hanging out on your website as they view or scroll through pictures.
More importantly, images can be optimised to help your content appear in search results. By adding suitable keywords to a picture’s ‘alternative text‘, file name and caption, you can help search engines gain a better understanding of what your post is about.
However, keep an eye out for the file size of the images you plan on using on your website. Very heavy images with high resolutions can increase page load time, which can, in turn, affect how search engines treat your content in search.
E-newsletter Sign-ups
Newsletter sign-ups are a very effective way to keep your audience engaged long after they have left your website. Capturing your visitor’s email address allows you to notify visitors via e-newsletter of new blog posts, which can result in more traffic and shares.
When creating such sign-ups, it’s essential you point out the perks of doing so and how the person is to benefit from becoming a subscriber.
Here is an example:

Photo Credit: stylefactoryproductions.com
Using email marketing tools here is highly recommended such as Getresponse, Aweber, Mailchimp or Mad Mimi. These tools power your e-newsletters; meaning that every time you add a new blog post, your subscribers will automatically receive an e-newsletter with a notification about the new content.
Encourage CTAs
Actively encourage your audience to share your blog posts – be explicit with your requests by requesting people to post your content on Twitter, Facebook and other social networks.
Usually, these encouragements are rewarded, and you are likely to note a surge in traffic on your blog posts.
Clever use of social sharing icons using applications such as Sumo or Addthis will definitely help!
To conclude, optimising your Shopify intrinsically by adding quality content is the most important task since many of the technical SEO tips we shared with you are going to be short-lived if your content is not engaging enough.
For a more detailed read on how to improve the same, book a call with the Pearl Lemon Shopify SEO team!

